Grilled Eggplant Rolls with Ricotta

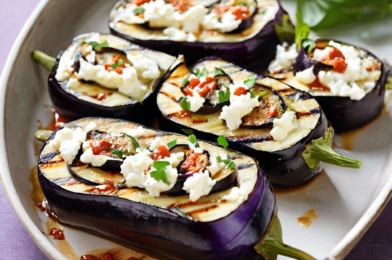
There’s something utterly delightful about the combination of grilled eggplant and creamy ricotta cheese. This recipe for Grilled Eggplant Rolls with Ricotta has quickly become a family favorite in my household. The smoky flavor of the grilled eggplant combined with the smooth, rich ricotta filling creates a harmonious blend of flavors that even the pickiest eaters can’t resist. Whether served as an appetizer or a light main course, these rolls are a testament to the magic that happens when simple ingredients come together in the right way.

Ingredients

To craft these delectable Grilled Eggplant Rolls, you’ll need a handful of fresh, vibrant ingredients. Each component plays a crucial role in building the layers of flavor that make this dish exceptional. Here’s what you’ll need:

  • 2 large eggplants, sliced lengthwise into thin strips
  • 1 cup ricotta cheese
  • 1/2 cup grated Parmesan cheese
  • 2 cloves garlic, minced
  • 1 tablespoon fresh basil, chopped
  • 1 tablespoon fresh parsley, chopped
  • Salt and pepper to taste
  • Olive oil for brushing
  • 1 cup marinara sauce
  • Fresh basil leaves for garnish

Instructions

The process of making Grilled Eggplant Rolls with Ricotta is as enjoyable as eating them. Here’s a step-by-step guide to help you create this delightful dish:

  1. Prepare the eggplant: Start by preheating your grill to medium-high heat. Lightly brush both sides of the eggplant slices with olive oil and season with salt and pepper. Grill the eggplant slices for about 3-4 minutes on each side until they are tender and have nice grill marks.
  2. Prepare the filling: In a mixing bowl, combine the ricotta cheese, Parmesan cheese, minced garlic, chopped basil, and parsley. Mix well until all the ingredients are evenly incorporated. Taste and adjust the seasoning with salt and pepper as needed.
  3. Assemble the rolls: Lay a slice of grilled eggplant on a clean surface. Place a spoonful of the ricotta mixture at one end of the eggplant slice. Carefully roll the eggplant around the filling, securing it with a toothpick if necessary. Repeat with the remaining slices and filling.
  4. Bake the rolls: Preheat your oven to 350°F (175°C). In a baking dish, spread a thin layer of marinara sauce. Arrange the eggplant rolls seam side down in the dish. Pour the remaining marinara sauce over the top of the rolls.
  5. Finish and serve: Bake the rolls in the preheated oven for about 15-20 minutes until the sauce is bubbly and the rolls are heated through. Garnish with fresh basil leaves before serving.

Nutrition Facts

When considering how these Grilled Eggplant Rolls with Ricotta fit into your dietary plan, it’s important to note the nutritional value:

  • Servings: This recipe yields approximately 4 servings.
  • Calories per serving: Around 250 calories.

Preparation Time

This recipe is not only delicious but also quick to prepare, making it perfect for a weeknight dinner:

  • Preparation time: 20 minutes
  • Cooking time: 20 minutes
  • Total time: 40 minutes

How to Serve

Grilled Eggplant Rolls with Ricotta can be served in various ways to suit different occasions:

  • As an appetizer: Serve the rolls on a platter, garnished with fresh basil and a side of extra marinara sauce for dipping.
  • As a main course: Accompany the rolls with a side salad or roasted vegetables for a light, balanced meal.
  • At a gathering: Arrange the rolls on a large serving dish and sprinkle with extra Parmesan cheese for a touch of elegance.
  • As a potluck dish: These rolls travel well and can be easily reheated, making them a great choice for potlucks or picnics.
  • Paired with wine: For a sophisticated touch, serve with a chilled glass of white wine, such as a Sauvignon Blanc or Pinot Grigio.

Additional Tips

To ensure your Grilled Eggplant Rolls with Ricotta turn out perfectly every time, consider these additional tips:

  1. Selecting the eggplant: Choose firm, glossy eggplants with no blemishes for the best texture and flavor.
  2. Salting the eggplant: If your eggplants are particularly large, consider salting them to remove any bitterness and excess moisture.
  3. Grill temperature: Make sure your grill is adequately preheated to ensure even cooking and beautiful grill marks.
  4. Cheese variations: Feel free to experiment with different cheeses, such as goat cheese or feta, for a unique twist on the filling.
  5. Make ahead: You can prepare the rolls in advance and store them in the refrigerator for up to 24 hours before baking.

FAQ Section

Here are some frequently asked questions about making Grilled Eggplant Rolls with Ricotta:

  1. Can I use a grill pan instead of an outdoor grill?
    Yes, a grill pan works perfectly for cooking the eggplant indoors, providing similar grill marks and flavor.
  2. Can I freeze the eggplant rolls?
    It’s not recommended to freeze the rolls as the texture of the eggplant may change, becoming mushy upon thawing.
  3. What can I use instead of ricotta cheese?
    Cottage cheese or a blend of cream cheese and Greek yogurt can be used as substitutes for ricotta.
  4. How do I prevent the rolls from unrolling?
    Secure the rolls with toothpicks or tie them with chives for an elegant presentation and to keep them intact.
  5. Can I add meat to the recipe?
    Absolutely! Adding cooked crumbled sausage or bacon to the filling can introduce an extra layer of flavor.

Creating these Grilled Eggplant Rolls with Ricotta is a rewarding culinary experience that brings a taste of the Mediterranean to your table. Their versatile nature makes them suitable for various occasions, from casual dinners to elegant gatherings. Embrace the simplicity and flavor of this dish, and enjoy the compliments that are sure to follow.

Herbed Goat Cheese Spread

When I first stumbled upon the recipe for Herbed Goat Cheese Spread, it immediately caught my attention. As a family that loves to experiment with different flavors and textures, I thought this would be a delightful addition to our dinner table. I was right. The moment my family tasted it, they were hooked. The creamy texture of the goat cheese combined with the fresh, aromatic herbs created a spread that was both sophisticated and comforting. It quickly became a household favorite, perfect for gatherings and casual dinners alike. The best part? It was incredibly easy to make, making it a go-to option for both planned events and impromptu get-togethers.

Ingredients

The charm of this Herbed Goat Cheese Spread lies in its simplicity and the quality of its ingredients. To create this spread, you will need:

  • 8 oz of fresh goat cheese
  • 2 tablespoons of fresh parsley, finely chopped
  • 1 tablespoon of fresh chives, finely chopped
  • 1 tablespoon of fresh dill, finely chopped
  • 1 clove of garlic, minced
  • 1 tablespoon of lemon juice
  • Salt and pepper to taste
  • 1 tablespoon of extra virgin olive oil

Each of these ingredients adds its own unique flavor, coming together to form a cohesive and delicious spread. The goat cheese provides a rich, tangy base, while the herbs and garlic add freshness and zest. The olive oil and lemon juice tie everything together, enhancing the flavors without overpowering them.

Instructions

Creating this Herbed Goat Cheese Spread is as simple as it is satisfying. Follow these steps to bring the delightful taste of herbs and cheese to your table:

  1. Start by placing the goat cheese in a medium-sized bowl. Allow it to sit at room temperature for about 10 minutes to soften.
  2. Add the chopped parsley, chives, and dill to the bowl. These fresh herbs will bring vibrant color and flavor to your spread.
  3. Incorporate the minced garlic into the mixture, ensuring it is evenly distributed.
  4. Drizzle the lemon juice and olive oil over the mixture, adding a touch of acidity and richness.
  5. Mix everything together with a fork until the herbs are evenly distributed and the cheese is creamy and smooth.
  6. Season with salt and pepper to taste, adjusting as needed to suit your preferences.
  7. Transfer the spread to a serving dish, smoothing the top with a spatula.
  8. For the best flavor, let the spread sit for at least 30 minutes before serving to allow the flavors to meld together.

This process is straightforward and leaves plenty of room for personal touches, whether you want to add more herbs or experiment with different seasonings.

Nutrition Facts

The Herbed Goat Cheese Spread is not only delicious but also relatively nutritious. Here are the nutrition facts per serving:

  • Servings: 8
  • Calories per serving: Approximately 110 calories

It’s important to note that these values can vary based on the exact ingredients used and the portion sizes. The spread is rich in protein and healthy fats, making it a satisfying and energizing addition to any meal.

Preparation Time

One of the most appealing aspects of the Herbed Goat Cheese Spread is its quick preparation time. From start to finish, you can have this delicious spread ready in just about 15 minutes, not including the resting time for the flavors to meld. This makes it an ideal choice for those who need a quick appetizer or a last-minute addition to their menu.

How to Serve

Herbed Goat Cheese Spread is versatile and can be served in a variety of ways. Here are some ideas to inspire you:

  • With Crackers: Serve with an assortment of crackers for a simple yet elegant appetizer.
  • On Bread: Spread it on slices of fresh baguette or toasted bread for a delicious snack.
  • With Vegetables: Pair it with fresh vegetables such as carrot sticks, cucumber slices, or bell pepper strips for a healthy option.
  • As a Sandwich Spread: Use it as a flavorful spread for sandwiches and wraps.
  • As a Salad Topper: Add a dollop to your favorite salad for an extra burst of flavor.

These serving suggestions highlight the spread’s versatility and make it easy to incorporate into a wide range of dishes and occasions.

Additional Tips

To ensure your Herbed Goat Cheese Spread is the best it can be, consider these additional tips:

  1. Use Fresh Herbs: Fresh herbs provide the best flavor and aroma. Dried herbs can be used in a pinch, but they won’t deliver the same vibrant taste.
  2. Customize the Herbs: Feel free to substitute or add different herbs based on your preferences. Basil, thyme, or tarragon can all be excellent additions.
  3. Make Ahead: Prepare the spread a day in advance and store it in the refrigerator, allowing the flavors to fully develop.
  4. Room Temperature Serving: Allow the spread to come to room temperature before serving for the best texture and flavor.
  5. Experiment with Flavors: Consider adding a pinch of red pepper flakes for a hint of heat or a touch of honey for a subtle sweetness.

These tips will help you tailor the spread to your liking and ensure it impresses every time.

FAQ Section

Here are some frequently asked questions about Herbed Goat Cheese Spread:

Q: Can I use another type of cheese instead of goat cheese?

A: While goat cheese is recommended for its creamy texture and tangy flavor, you can substitute it with cream cheese or feta for a different taste and texture.

Q: How long does the spread last in the refrigerator?

A: The Herbed Goat Cheese Spread can be stored in an airtight container in the refrigerator for up to 5 days. Ensure it is tightly sealed to maintain freshness.

Q: Can I freeze the spread?

A: Freezing is not recommended as it can alter the texture of the cheese. It’s best enjoyed fresh or refrigerated.

Q: Is the spread suitable for vegetarians?

A: Yes, the Herbed Goat Cheese Spread is vegetarian-friendly, as it contains no meat-based ingredients.

Q: Can I make the spread without garlic?

A: Absolutely. If you’re not a fan of garlic or have dietary restrictions, you can omit it and adjust the other seasonings to taste.

With these insights and answers, you’re well-prepared to make and enjoy this delightful Herbed Goat Cheese Spread. Whether you’re hosting a party or simply want a delicious snack, this recipe is sure to please.

Crispy Onion Rings (Baked)

I recently had the pleasure of trying out a delightful recipe that has quickly become a favorite in my household: crispy onion rings, but with a healthier twist—they’re baked instead of fried. The result? A guilt-free indulgence that doesn’t skimp on flavor or crunch. My family, who are usually fans of traditional deep-fried onion rings, were initially skeptical. However, after just one bite, they were hooked. The baked version retains all the savory appeal of the original, minus the extra grease and calories. This recipe not only satisfied our craving for something crispy but also left us feeling light and happy, making it a win-win for our family meal times.

Ingredients

The key to making these baked onion rings irresistible lies in the ingredients used. Here is what you’ll need:

  • 2 large onions, preferably sweet varieties like Vidalia or Walla Walla
  • 1 cup all-purpose flour
  • 2 teaspoons baking powder
  • 1 teaspoon salt
  • 1 teaspoon black pepper
  • 1 cup buttermilk
  • 2 eggs
  • 2 cups panko breadcrumbs
  • 1 teaspoon paprika
  • 1 teaspoon garlic powder
  • Olive oil spray

Instructions

Preparing these crispy onion rings is a straightforward process, though it does require a bit of patience. Follow these steps for perfect results:

Step 1: Preheat your oven to 450°F (230°C) and line a baking sheet with parchment paper or lightly oil it to prevent sticking.

Step 2: Peel the onions and slice them into 1/4-inch thick rings. Separate the rings carefully and set aside the smaller inner rings for another use or discard them.

Step 3: In a shallow dish, combine the flour, baking powder, salt, and pepper. Mix well to ensure even seasoning.

Step 4: In another bowl, whisk together the buttermilk and eggs until smooth. This mixture will act as the binding agent for the breadcrumbs.

Step 5: In a third dish, combine the panko breadcrumbs with paprika and garlic powder. Stir to evenly distribute the spices.

Step 6: Dip each onion ring into the flour mixture, tapping off any excess. Then, dip it into the buttermilk mixture, allowing any excess to drip off. Finally, coat it thoroughly with the seasoned panko breadcrumbs, pressing gently to ensure they adhere.

Step 7: Place the coated onion rings on the prepared baking sheet in a single layer. Lightly spray them with olive oil to help them crisp up in the oven.

Step 8: Bake in the preheated oven for 15-20 minutes, flipping halfway through, until the onion rings are golden brown and crispy.

Step 9: Remove from the oven and let them cool slightly before serving. Enjoy your crispy, baked onion rings with your favorite dipping sauce.

Nutrition Facts

This recipe yields approximately 4 servings, with each serving containing about 250 calories. It’s a lighter alternative to traditional fried onion rings, making it a great choice for those looking to enjoy a healthier snack without sacrificing taste.

Preparation Time

The preparation time for these crispy baked onion rings is about 20 minutes, with an additional 15-20 minutes for baking. In total, you can have a delicious and satisfying snack ready in under an hour, making it perfect for impromptu gatherings or a quick family treat.

How to Serve

These onion rings are versatile and can be served in a variety of ways:

  • As a side dish alongside burgers, sandwiches, or wraps.
  • As an appetizer with a variety of dipping sauces such as ranch, spicy aioli, or honey mustard.
  • As a topping for salads, adding a crunchy element to your greens.
  • In a party platter, paired with other finger foods like mozzarella sticks or chicken wings.
  • As a snack on their own, when you’re craving something savory and crispy.

Additional Tips

To ensure your onion rings turn out perfectly crispy, consider these additional tips:

  • Tip 1: Use sweet onions like Vidalia for a milder, sweeter taste that complements the crispy coating.
  • Tip 2: If you don’t have buttermilk, you can make a substitute by adding a tablespoon of lemon juice or vinegar to a cup of milk and letting it sit for 5 minutes.
  • Tip 3: For extra crispiness, you can double-coat the onion rings by repeating the dipping process before baking.
  • Tip 4: Make sure not to overcrowd the baking sheet, as this can prevent the rings from cooking evenly and becoming crispy.
  • Tip 5: If you prefer a spicier kick, add a dash of cayenne pepper to the breadcrumb mixture.

FAQ Section

Q1: Can I make these onion rings gluten-free?

A1: Yes, you can substitute the all-purpose flour and panko breadcrumbs for their gluten-free counterparts. Ensure that the baking powder used is also gluten-free.

Q2: Can I prepare the onion rings in advance?

A2: You can slice the onions and prepare the breadcrumb mixture in advance, but for best results, coat and bake them just before serving to retain crispiness.

Q3: Can I use an air fryer instead of an oven?

A3: Absolutely! Air fryers are great for making crispy foods with less oil. Cook the onion rings in the air fryer at 400°F (200°C) for about 10-12 minutes, shaking the basket halfway through.

Q4: What dipping sauces pair well with these onion rings?

A4: Some popular choices include ranch, BBQ sauce, honey mustard, or a spicy sriracha mayo. Feel free to experiment with your favorites.

Q5: How should I store leftovers?

A5: Store any leftover onion rings in an airtight container in the refrigerator for up to 3 days. Reheat them in the oven or air fryer to restore their crispiness before serving.

Watermelon Feta Salad Bites

Watermelon Feta Salad Bites have quickly become a staple in my household, especially during the warmer months. The combination of sweet, juicy watermelon with the salty, creamy feta cheese is a match made in culinary heaven. I first encountered this delightful dish at a summer barbecue hosted by a close friend. The vibrant colors and intriguing blend of flavors caught my attention immediately. My family, who were initially skeptical of the unusual pairing, were soon won over by the refreshing taste. These salad bites have since become a go-to appetizer for our gatherings, leaving everyone asking for more.

Ingredients

To recreate these delicious Watermelon Feta Salad Bites, you’ll need the following ingredients:

  • 1 small seedless watermelon – Choose a watermelon that is firm and heavy for its size.
  • 1 block of feta cheese – Opt for high-quality feta to ensure the best flavor.
  • Fresh mint leaves – These add a burst of freshness to the dish.
  • 1 tablespoon of extra virgin olive oil – For a subtle richness.
  • Salt and pepper – To taste.
  • 1 lime – For a zesty finish.
  • Toothpicks or small skewers – For assembling the bites.

Instructions

Creating these Watermelon Feta Salad Bites is a straightforward process that can be accomplished in a few easy steps:

  1. Prepare the Watermelon: Begin by slicing the watermelon into 1-inch thick slices. Then, cut each slice into bite-sized cubes, about 1 inch in diameter. Ensure the cubes are uniform for a pleasing presentation.
  2. Cut the Feta Cheese: Slice the block of feta cheese into small cubes that match the size of your watermelon pieces. Consistency in size will make assembly easier and the bites more visually appealing.
  3. Assemble the Bites: Take a toothpick or small skewer and thread a watermelon cube, followed by a piece of feta cheese, and lastly a mint leaf. Repeat this process until all ingredients are used.
  4. Dress the Bites: In a small bowl, mix the olive oil, a pinch of salt, and pepper. Drizzle this mixture lightly over the assembled bites for a touch of richness.
  5. Finish with Lime: Squeeze a bit of lime juice over the completed bites to enhance the flavors and add a zesty twist.

Nutrition Facts

This recipe yields approximately 24 servings, depending on the size of your watermelon and feta cubes. Each serving contains around 60 calories, making it a light and healthy option for any occasion.

Preparation Time

The beauty of Watermelon Feta Salad Bites lies not only in their taste but also in their quick preparation. You can have these delightful bites ready to serve in just about 20 minutes, making them perfect for last-minute entertaining or a quick snack.

How to Serve

Watermelon Feta Salad Bites are versatile and can be served in a variety of ways:

  • As an appetizer at summer barbecues or picnics.
  • On a charcuterie board alongside other cheeses and fruits.
  • As a refreshing side dish at brunch gatherings.
  • Paired with a chilled glass of white wine or rosé.
  • As a light snack during a warm afternoon.

Additional Tips

To ensure your Watermelon Feta Salad Bites are a hit, consider these additional tips:

  1. Choose Fresh Ingredients: The quality of the watermelon and feta will significantly impact the flavor. Opt for fresh and in-season produce.
  2. Experiment with Herbs: While mint is a classic choice, basil or arugula can also complement the flavors beautifully.
  3. Chill Before Serving: For an extra refreshing treat, chill the assembled bites in the refrigerator for 10-15 minutes before serving.
  4. Use Flavored Olive Oil: Infused olive oils, such as lemon or basil, can add an interesting dimension to the bites.
  5. Adjust to Taste: Feel free to modify the amount of feta and mint to suit your personal taste preferences.

FAQ Section

Q1: Can I make these salad bites ahead of time?

A: Yes, you can prepare the components a few hours in advance. Assemble them just before serving to keep the watermelon fresh.

Q2: What can I substitute for feta cheese?

A: Goat cheese or a mild blue cheese can be excellent substitutes if you prefer a different flavor profile.

Q3: How do I store leftovers?

A: Store any leftover bites in an airtight container in the refrigerator for up to 24 hours. The watermelon may release some juice, so consider storing them on a paper towel to absorb excess moisture.

Q4: Can I use other types of melon?

A: Absolutely! Cantaloupe or honeydew melon can also work beautifully with feta cheese and mint.

Q5: Are these salad bites suitable for a vegan diet?

A: To make this dish vegan, you can substitute the feta with a plant-based cheese alternative.

Mini Veggie Empanadas

There’s something incredibly heartwarming about the aroma of freshly baked empanadas wafting through the kitchen. My family and I recently had the pleasure of indulging in a batch of mini veggie empanadas, and let me tell you, they were a hit from the very first bite. These delightful little pockets of goodness are not only visually appealing but also packed with flavors that dance on your taste buds. Whether you’re a seasoned empanada enthusiast or a newcomer to this Latin American staple, these mini veggie empanadas promise to captivate and satisfy every palate at your dining table.

Ingredients

The magic of mini veggie empanadas lies in their versatility and the fresh, vibrant ingredients they incorporate. For this recipe, you’ll need the following:

  • 2 cups of all-purpose flour
  • 1/2 teaspoon of salt
  • 1/2 cup of unsalted butter, chilled and diced
  • 1/4 cup of cold water
  • 1 tablespoon of olive oil
  • 1 small onion, finely chopped
  • 1 garlic clove, minced
  • 1 red bell pepper, diced
  • 1 cup of corn kernels
  • 1 cup of black beans, rinsed and drained
  • 1 teaspoon of cumin
  • 1 teaspoon of paprika
  • 1/2 teaspoon of chili powder
  • 1/2 cup of crumbled feta cheese
  • Salt and pepper to taste
  • 1 egg, beaten (for egg wash)

Instructions

Creating these mini veggie empanadas is an enjoyable culinary journey. Start by making the dough. In a large mixing bowl, combine the flour and salt. Add the chilled, diced butter and work it into the flour using your fingertips until the mixture resembles coarse breadcrumbs. Gradually add the cold water, mixing until the dough comes together. Wrap the dough in plastic wrap and refrigerate for at least 30 minutes.

While the dough chills, prepare the filling. Heat the olive oil in a medium-sized skillet over medium heat. Add the chopped onion and sauté until translucent. Stir in the minced garlic and cook for an additional minute. Add the diced red bell pepper, corn, and black beans, cooking until the vegetables are tender. Season the mixture with cumin, paprika, chili powder, salt, and pepper. Remove from heat and let it cool slightly before stirring in the crumbled feta cheese.

Preheat your oven to 375°F (190°C). Roll out the chilled dough on a lightly floured surface to about 1/8-inch thickness. Using a round cutter, cut circles from the dough. Spoon a small amount of the veggie mixture onto one half of each circle, leaving enough space to fold the dough over. Brush the edges with water, fold, and press to seal, crimping with a fork for a decorative touch.

Place the empanadas on a baking sheet lined with parchment paper. Brush the tops with the beaten egg to achieve a golden, crispy finish. Bake for 20-25 minutes or until the empanadas are golden brown. Allow them to cool slightly before serving warm.

Nutrition Facts

This recipe yields approximately 12 mini veggie empanadas. Each empanada serves as a delightful snack or appetizer. With an estimated 150 calories per serving, these empanadas are a guilt-free indulgence that aligns with a balanced diet.

Preparation Time

Preparation is a breeze with these mini veggie empanadas. Allocate about 20 minutes for prepping the ingredients, including chopping and mixing, and allow 30 minutes for the dough to rest. The cooking process itself takes roughly 25 minutes, making this an ideal recipe for both leisurely weekends and busy weeknights.

How to Serve

These mini veggie empanadas can be served in a variety of ways, making them a versatile addition to any meal:

  • As a delightful appetizer before a main course, paired with a zesty salsa or guacamole.
  • As a main dish, accompanied by a fresh green salad for a light, nutritious meal.
  • As a snack for a party or gathering, easily shared among guests.
  • For a picnic or lunchbox treat, offering a flavorful alternative to sandwiches.
  • With a side of sour cream or yogurt dip for added creaminess and a cooling effect.

Additional Tips

To ensure your mini veggie empanadas turn out perfectly every time, consider these additional tips:

  1. Chill the Dough: Allowing the dough to chill is crucial for achieving a tender, flaky crust. Don’t skip this step!
  2. Customize the Filling: Feel free to experiment with different vegetables and cheeses based on personal preference or seasonal availability.
  3. Seal Well: Ensure the edges are tightly sealed to prevent the filling from leaking during baking.
  4. Storage: These empanadas can be made ahead of time and stored in the refrigerator for up to three days or frozen for up to a month.
  5. Reheat: For best results, reheat the empanadas in a preheated oven to restore their crispiness rather than using a microwave.

FAQ Section

Q: Can I make the dough ahead of time?

A: Yes, the dough can be prepared and refrigerated up to 24 hours in advance. Simply roll it out when you’re ready to assemble the empanadas.

Q: Are there gluten-free options for this recipe?

A: Absolutely! You can substitute all-purpose flour with a gluten-free flour blend. Just ensure it’s suitable for baking to achieve the desired texture.

Q: What other fillings can I use?

A: The filling possibilities are endless! Try incorporating ingredients like mushrooms, spinach, or sweet potatoes for a unique twist.

Q: How can I make these empanadas spicier?

A: To amp up the heat, add diced jalapeños or a dash of hot sauce to the filling mixture.

Q: Can I bake these in an air fryer?

A: Yes, you can bake the empanadas in an air fryer. Cook them at 350°F (175°C) for about 10 minutes or until golden brown.

These mini veggie empanadas are sure to become a staple in your culinary repertoire, bringing joy and flavor to every occasion. Enjoy the process of making them and savor each delightful bite!

Roasted Chickpeas with Paprika

There’s something truly delightful about the transformation of simple ingredients into something extraordinary, and that’s precisely what happens with roasted chickpeas with paprika. I recently made this recipe for my family, and it was met with rave reviews. The chickpeas came out perfectly crispy, with a smoky flavor that was both comforting and intriguing. They disappeared almost as quickly as they were placed on the table, with everyone reaching for handful after handful. It’s a dish that’s not only easy to make but also incredibly satisfying, providing a healthy snack or a flavorful addition to salads and other meals.

Ingredients

The beauty of this dish lies in its simplicity. You don’t need a long list of ingredients to create a delicious and healthy snack. Here’s what you’ll need:

  • 1 can (15 ounces) of chickpeas – drained and rinsed
  • 2 tablespoons of olive oil – for that rich, healthy fat that helps the chickpeas crisp up
  • 1 teaspoon of smoked paprika – the star of the show, offering a smoky depth of flavor
  • ½ teaspoon of garlic powder – adds a savory, aromatic quality
  • ½ teaspoon of salt – to taste, enhancing all other flavors
  • ¼ teaspoon of black pepper – for a slight kick

Instructions

The process of making roasted chickpeas with paprika is straightforward and rewarding. Follow these steps for a perfect outcome:

  1. Preheat your oven to 400°F (200°C). A hot oven is key to achieving that crispy texture.
  2. Dry the chickpeas thoroughly using a clean kitchen towel or paper towels. Removing excess moisture is crucial for crispiness.
  3. In a mixing bowl, combine the chickpeas with olive oil, smoked paprika, garlic powder, salt, and pepper. Toss them well so each chickpea is evenly coated with the seasoning.
  4. Spread the chickpeas in a single layer on a baking sheet lined with parchment paper. Avoid overcrowding to ensure even roasting.
  5. Roast in the preheated oven for 25-30 minutes, stirring halfway through. Keep an eye on them to prevent burning.
  6. Once roasted to a golden brown and crispy texture, remove from the oven and allow them to cool slightly before serving.

Nutrition Facts

This recipe makes about 4 servings, and each serving contains approximately 120 calories. It’s a guilt-free snack that’s high in protein and fiber, making it a perfect choice for those looking to maintain a healthy diet.

Preparation Time

From start to finish, this recipe takes about 40 minutes. Most of this time is hands-off while the chickpeas are roasting in the oven, allowing you to prepare other parts of your meal or simply relax.

How to Serve

Roasted chickpeas with paprika are versatile and can be served in a variety of ways. Here are some ideas:

  • As a snack: Serve them in a bowl for a healthy, crunchy snack.
  • On salads: Sprinkle them over salads for added texture and flavor.
  • In wraps: Use them as a filling in wraps or burritos.
  • With soups: Add them to soups as a crunchy topping.
  • As a side dish: Pair them with grilled meats or vegetables for a complete meal.

Additional Tips

To ensure your roasted chickpeas are always a success, consider the following tips:

  1. Dry the chickpeas well: Moisture is the enemy of crispy chickpeas, so make sure they are thoroughly dried before seasoning.
  2. Don’t skimp on the oil: Olive oil helps achieve that desired crispiness, so be generous with it.
  3. Experiment with flavors: While smoked paprika is delicious, you can try other spices like cumin or curry powder for variety.
  4. Store them properly: If you have leftovers, store them in an airtight container to maintain their crunchiness.
  5. Re-crisp before serving: If they lose their crispiness, simply reheat them in the oven for a few minutes before serving.

FAQ Section

Here are some common questions about roasted chickpeas with paprika:

  1. Can I use dried chickpeas instead of canned? Yes, just make sure to soak and cook them before roasting.
  2. How do I store roasted chickpeas? Keep them in an airtight container at room temperature for up to 3 days.
  3. Can I make this recipe oil-free? While oil helps with crispiness, you can try using a non-stick spray or skipping it altogether, but the texture may vary.
  4. Are roasted chickpeas with paprika gluten-free? Yes, they are naturally gluten-free, making them suitable for those with gluten sensitivities.
  5. What other spices can I use? Feel free to experiment with different spices like cayenne pepper for heat or rosemary for an herby flavor.

Stuffed Dates with Almonds

There’s something magical about the combination of sweet and savory, and stuffed dates with almonds perfectly encapsulate this delightful balance. When I first prepared this dish for my family, I was a bit skeptical about how the flavors would meld together. However, the moment my family took their first bites, their faces lit up with delight. The chewy sweetness of the dates combined with the crunchy, nutty flavor of the almonds created a symphony of taste that was both unexpected and delicious. It quickly became a favorite, requested regularly at family gatherings and special occasions. This simple yet sophisticated recipe not only pleased the palate but also sparked conversations about the creativity and versatility of ingredients.

Ingredients

The list of ingredients needed for stuffed dates with almonds is wonderfully short, yet each component plays a crucial role in the dish’s overall flavor profile. Here’s what you’ll need:

  • 16 Medjool dates, pitted
  • 16 whole raw almonds
  • 2 tablespoons of cream cheese or goat cheese (optional)
  • A pinch of sea salt
  • 1 tablespoon of honey (optional, for drizzling)
  • 1 teaspoon of orange zest (optional, for a citrusy hint)

Instructions

Preparing stuffed dates with almonds is a straightforward process, yet the end result is delightfully intricate in flavor. Follow these steps to create your own batch of this delectable snack:

  1. Begin by carefully pitting the dates if they aren’t already pitted. Use a small knife to make a slit along the length of each date, being cautious not to cut all the way through.
  2. If you’re using cheese, take a small amount and gently insert it into the center of each date. This adds a creamy texture and tangy flavor that contrasts beautifully with the sweetness of the dates.
  3. Place an almond in the center of each date, pressing it into the cheese if using.
  4. Sprinkle a tiny pinch of sea salt on top of each stuffed date to enhance the flavors.
  5. If you choose, drizzle a small amount of honey and sprinkle orange zest over the dates to add a layer of complexity to the taste.
  6. Arrange the stuffed dates on a serving platter, and they’re ready to enjoy!

Nutrition Facts

This recipe yields about 16 stuffed dates, serving approximately 8 people if each person enjoys two dates. Each serving contains around 120 calories, making it a relatively light treat that’s both satisfying and packed with flavor.

Preparation Time

One of the many appealing aspects of this recipe is its efficiency. The total time needed to prepare stuffed dates with almonds is approximately 15 minutes. This makes it an ideal choice for quick snacks or appetizers when you’re pressed for time but still want to impress your guests with a gourmet touch.

How to Serve

There are numerous ways to serve stuffed dates with almonds, allowing you to tailor the presentation to the occasion:

  • As an appetizer: Arrange on a platter with a variety of cheeses and crackers for a sophisticated start to a meal.
  • With a charcuterie board: Include alongside cured meats and olives for a Mediterranean-themed spread.
  • For a snack: Serve with tea or coffee for a delightful afternoon pick-me-up.
  • At parties: Place them on toothpicks for easy grabbing and snacking at social gatherings.
  • As a dessert: Pair with a scoop of vanilla ice cream or a dollop of whipped cream for a sweet finish to a meal.

Additional Tips

To ensure your stuffed dates with almonds turn out perfectly every time, consider these helpful tips:

  1. Select high-quality dates: Opt for Medjool dates, which are larger and juicier, providing the best texture and flavor.
  2. Experiment with fillings: While almonds are classic, you can substitute with walnuts, pecans, or even pistachios for a different taste experience.
  3. Try different cheeses: For a richer flavor, experiment with blue cheese or ricotta instead of cream cheese or goat cheese.
  4. Enhance presentation: Garnish with fresh herbs like mint or basil for a pop of color and freshness.
  5. Make ahead: Prepare the dates a day in advance and store them in the refrigerator to save time on the day of your event.

FAQ

Q: Can I use a different type of nut instead of almonds?

A: Absolutely! Walnuts, pecans, or pistachios can be excellent substitutes and offer unique flavor profiles.

Q: Are there any vegan alternatives for this recipe?

A: Yes, you can use a vegan cream cheese or skip the cheese entirely for a vegan-friendly version.

Q: How long can I store stuffed dates with almonds?

A: They can be stored in an airtight container in the refrigerator for up to 3 days. Allow them to reach room temperature before serving for the best flavor.

Q: Can I add other ingredients to the filling?

A: Feel free to get creative! Adding a small amount of chopped herbs or spices such as cinnamon or nutmeg can elevate the dish.

Q: Are there health benefits to eating dates?

A: Yes, dates are a good source of fiber, natural sugars, and essential minerals like potassium and magnesium, making them a healthy choice for a sweet treat.

Crispy Tofu Nuggets

There are few joys in the culinary world as delightful as discovering a recipe that pleases both the palate and the conscience. As a food enthusiast and a lifelong explorer of flavors, I recently embarked on a journey to perfect the art of crispy tofu nuggets. The verdict from my family? These nuggets were an absolute hit! With a texture that rivals traditional chicken nuggets and a flavor profile that’s both surprising and satisfying, they’ve quickly become a staple in our household. Even the most skeptical members of my family, who were initially hesitant about tofu, found themselves reaching for seconds. It’s a testament to the versatility of tofu when prepared with a bit of creativity and care.

Ingredients

The beauty of this recipe lies in its simplicity and the commonality of its ingredients. Here’s what you’ll need to whip up these delightful crispy tofu nuggets:

  • 1 block of firm tofu: Approximately 14 ounces, drained and pressed.
  • 1 cup of breadcrumbs: Panko breadcrumbs work best for extra crispiness.
  • 1/2 cup of all-purpose flour: This helps the breadcrumbs adhere to the tofu.
  • 1/4 cup of cornstarch: For added crispiness.
  • 1 teaspoon of garlic powder: Adds a subtle depth of flavor.
  • 1 teaspoon of smoked paprika: For a hint of smokiness.
  • Salt and pepper: To taste.
  • 2 tablespoons of soy sauce: Infuses the tofu with umami.
  • 1 tablespoon of olive oil: For brushing the tofu before baking.
  • 1/4 cup of unsweetened plant-based milk: For dipping the tofu.

Instructions

Creating these crispy tofu nuggets is a straightforward process. Follow these steps to achieve the perfect crunch:

  1. Prepare the Tofu: Begin by draining and pressing the tofu to remove excess moisture. This step is crucial for achieving the desired texture. Once pressed, cut the tofu into bite-sized cubes.
  2. Set Up Breading Station: In one shallow dish, combine flour, cornstarch, garlic powder, smoked paprika, salt, and pepper. In a second dish, pour the plant-based milk and soy sauce. In a third dish, place the panko breadcrumbs.
  3. Bread the Tofu: Dip each tofu piece first in the flour mixture, ensuring it’s fully coated. Then, dip it in the milk mixture, and finally coat it generously with breadcrumbs. Set aside on a baking sheet.
  4. Bake the Tofu: Preheat your oven to 400°F (200°C). Brush each tofu nugget with olive oil to promote browning. Bake for 25-30 minutes, flipping halfway through, until the nuggets are golden and crispy.
  5. Serve: Once done, remove from the oven and let cool slightly before serving. Enjoy with your favorite dipping sauces!

Nutrition Facts

These crispy tofu nuggets make for a nutritious meal or snack. Here are the nutrition facts per serving:

  • Servings: 4
  • Calories per serving: Approximately 250 calories

Preparation Time

One of the many appealing aspects of this recipe is its efficiency. From start to finish, you can have these delicious nuggets ready in about 45 minutes. Here’s a quick breakdown:

  • Prep Time: 15 minutes
  • Cook Time: 30 minutes

How to Serve

The versatility of these crispy tofu nuggets allows them to shine in a variety of serving styles. Here are a few suggestions to enhance your dining experience:

  • Serve with a homemade dipping sauce, such as spicy mayo or sweet chili sauce, to add an extra burst of flavor.
  • Pair with a fresh, vibrant salad or a side of roasted vegetables for a well-rounded meal.
  • Include in a wrap with lettuce, tomato, and avocado for a satisfying lunch option.
  • Use as a topping for a Buddha bowl, along with quinoa, steamed greens, and a drizzle of tahini.
  • Simply enjoy them as a snack on their own for a quick and healthy bite.

Additional Tips

To ensure the best possible outcome, consider these helpful tips when preparing your crispy tofu nuggets:

  1. Pressing Matters: Properly pressing the tofu is crucial. Use a tofu press or place the tofu between two plates, weighted down with a heavy object, to extract as much moisture as possible.
  2. Consistency is Key: Make sure the tofu pieces are uniform in size to ensure even cooking and crispiness.
  3. Breadcrumbs Selection: Opt for panko breadcrumbs for a lighter, crispier texture. If unavailable, regular breadcrumbs can be used as a substitute.
  4. Season to Taste: Don’t be afraid to adjust the seasonings according to your preference. Add more spices or herbs for a unique twist.
  5. Experiment with Sauces: These nuggets pair well with a variety of sauces. Experiment with different options to find your favorite combination.

FAQ Section

Here are some commonly asked questions regarding crispy tofu nuggets, along with helpful answers:

  1. Can I use silken tofu instead of firm tofu? It’s best to use firm or extra-firm tofu for this recipe, as silken tofu doesn’t hold its shape well during the breading and baking process.
  2. Can I make these nuggets gluten-free? Absolutely! Substitute the all-purpose flour and panko breadcrumbs with gluten-free alternatives to make this recipe suitable for a gluten-free diet.
  3. How do I store leftover tofu nuggets? Store any leftover nuggets in an airtight container in the refrigerator for up to three days. Reheat in an oven or air fryer to maintain their crispiness.
  4. Can I freeze the nuggets? Yes, you can freeze these nuggets after baking. Allow them to cool completely, then freeze on a baking sheet before transferring to a freezer-safe bag. Reheat them in the oven when ready to enjoy.
  5. What if I don’t have an oven? If an oven is not available, you can pan-fry the nuggets in a little oil over medium heat until they are golden and crispy.

In conclusion, these crispy tofu nuggets are a delightful addition to any meal plan, offering a healthy, plant-based alternative to traditional nuggets. Whether you’re a tofu aficionado or a newbie, this recipe is sure to impress and satisfy taste buds. Embrace the versatility of tofu and enjoy the crunch and flavor of these nuggets with your favorite sides and sauces.

Vegan Spring Rolls with Peanut Sauce

Vegan Spring Rolls with Peanut Sauce have become a beloved staple in my household, and it’s no surprise why. The vibrant colors and fresh flavors bring joy to the table, making every bite a delightful experience. My family, who can often be quite particular, embraced these rolls with open arms. Even the kids, who usually shy away from vegetables, found themselves reaching for seconds. The combination of crisp vegetables wrapped in delicate rice paper, paired with the creamy, nutty peanut sauce, creates a harmony that is simply irresistible. It’s a dish that not only satisfies the palate but also brings a sense of fulfillment and healthiness, making it a frequent request at our family dinners.

Ingredients

To create these delightful Vegan Spring Rolls, you will need the following ingredients:

  • 8 rice paper wrappers
  • 1 cup shredded carrots
  • 1 cup thinly sliced red cabbage
  • 1 cup julienned cucumber
  • 1 cup bean sprouts
  • 1 avocado, sliced
  • Fresh mint leaves
  • Fresh cilantro leaves
  • For the peanut sauce:
    • 1/2 cup peanut butter
    • 2 tablespoons soy sauce
    • 1 tablespoon lime juice
    • 1 tablespoon maple syrup
    • 1 teaspoon grated ginger
    • 1 garlic clove, minced
    • Water to thin, if necessary

Instructions

Creating these Vegan Spring Rolls is a simple and rewarding process. Follow these instructions to bring this delicious dish to life:

  1. Start by preparing the peanut sauce. In a medium-sized bowl, combine peanut butter, soy sauce, lime juice, maple syrup, grated ginger, and minced garlic. Whisk together until smooth. If the sauce is too thick, add water a tablespoon at a time until you reach your desired consistency.
  2. Prepare all your vegetables. Make sure they are washed and properly sliced or shredded. Having everything ready before you start rolling makes the process much smoother.
  3. Fill a shallow dish with warm water. Dip a rice paper wrapper into the water for about 10-15 seconds, until it becomes pliable but not overly soft. Lay it flat on a clean surface.
  4. Place a small amount of each vegetable, a slice or two of avocado, and a few mint and cilantro leaves in the center of the wrapper. Be careful not to overstuff.
  5. Fold the sides of the wrapper over the filling, then roll it up tightly, starting from the bottom. Repeat with the remaining wrappers and fillings.
  6. Serve the spring rolls immediately with the peanut sauce on the side for dipping.

Nutrition Facts

This recipe makes approximately 4 servings. Each serving contains about 250 calories. The rolls are not only light and refreshing but also packed with nutrients, providing a good balance of carbohydrates, healthy fats, and protein.

Preparation Time

The beauty of this recipe is in its simplicity and quick preparation. From start to finish, you can have these delicious Vegan Spring Rolls ready in just about 30 minutes. It’s perfect for a quick lunch or a dinner appetizer, ensuring you spend less time in the kitchen and more time enjoying your meal.

How to Serve

Serving Vegan Spring Rolls can be as creative as you like. Here are some ideas to inspire you:

  • Arrange the rolls on a platter with the peanut sauce in a small bowl in the center for a beautiful presentation.
  • Garnish with additional fresh herbs for an extra burst of flavor and color.
  • Pair with a fresh salad for a complete and balanced meal.
  • Serve alongside other Asian-inspired dishes for a themed dinner.
  • Offer a variety of dipping sauces, such as sweet chili or soy sauce, for guests to choose from.

Additional Tips

  1. Soak wisely: Be cautious not to over-soak the rice paper wrappers, as they can become too soft and tear easily. Aim for just pliable enough to work with.
  2. Use fresh ingredients: The freshness of your vegetables and herbs will make a significant difference in the taste and texture of your rolls.
  3. Customize fillings: Feel free to add tofu, tempeh, or other favorite veggies to suit your taste preferences.
  4. Make ahead: You can prepare the fillings and peanut sauce in advance. Just assemble the rolls right before serving to keep them fresh.
  5. Experiment with sauces: While the peanut sauce is a classic, try experimenting with different sauces to change up the flavors.

FAQ Section

  1. Can I store leftover spring rolls?
    Yes, you can store them in an airtight container in the refrigerator for up to 2 days. However, they are best enjoyed fresh.
  2. What if I have a peanut allergy?
    You can substitute almond or cashew butter for peanut butter in the sauce, or try a soy-based dipping sauce instead.
  3. Can I make these rolls gluten-free?
    Yes, ensure the soy sauce used is certified gluten-free, or replace it with tamari sauce.
  4. What other vegetables can I use?
    Feel free to experiment with bell peppers, zucchini, or spinach. The possibilities are endless!
  5. How can I make the rolls more filling?
    Add slices of baked tofu or tempeh for additional protein and substance.

Grilled Asparagus with Parmesan

As I stood in my kitchen, the scent of fresh asparagus wafting through the air, I couldn’t help but feel a sense of excitement. Grilled asparagus with Parmesan is not just a dish; it’s a culinary experience that brings together the simplicity of fresh produce with the rich, savory flavor of aged cheese. When I first served this dish to my family, their reactions were priceless. The crispy, slightly charred asparagus paired with the nutty, melted Parmesan was an instant hit. My husband, a self-proclaimed meat-lover, was surprised by how satisfying and flavorful a vegetable dish could be. Even my picky-eater children asked for seconds, which is a rare victory in our household. This recipe has since become a staple at our dinner table, celebrated for both its ease of preparation and delightful taste.

Ingredients

The beauty of this grilled asparagus with Parmesan recipe lies in its simplicity. You’ll need only a handful of ingredients, most of which you might already have in your pantry. Here’s what you’ll need:

  • 1 pound of fresh asparagus, trimmed
  • 2 tablespoons of olive oil
  • 1/4 cup of freshly grated Parmesan cheese
  • 1 teaspoon of garlic powder
  • Salt and freshly ground black pepper to taste
  • Lemon wedges for serving (optional)

The key to this dish is using fresh asparagus. When selecting asparagus, look for firm, bright green stalks with closed tips. The fresher the asparagus, the better the final dish will taste.

Instructions

Preparing grilled asparagus with Parmesan is straightforward, making it perfect for both novice cooks and seasoned chefs. Follow these steps for a foolproof dish:

  1. Preheat your grill: Start by preheating your grill to medium-high heat. If you’re using an outdoor grill, make sure the grates are clean and lightly oiled to prevent sticking.
  2. Prepare the asparagus: While the grill heats up, wash your asparagus under cold water and pat it dry with a kitchen towel. Trim the woody ends by bending each asparagus spear until it naturally snaps. This ensures you’re left with the tender part of the asparagus.
  3. Season the asparagus: Place the asparagus in a large bowl or on a baking sheet. Drizzle with olive oil, then sprinkle with garlic powder, salt, and pepper. Toss the asparagus to ensure each spear is evenly coated with the seasoning.
  4. Grill the asparagus: Arrange the asparagus spears in a single layer on the grill. Cook for 5-7 minutes, turning occasionally, until they’re tender and have nice grill marks.
  5. Add the Parmesan: Once the asparagus is grilled to your liking, remove it from the grill and place it on a serving platter. Immediately sprinkle the freshly grated Parmesan over the hot asparagus so it melts slightly. Serve with lemon wedges on the side for an optional citrusy kick.

Nutrition Facts

This recipe makes approximately four servings, with each serving containing around 120 calories. Grilled asparagus with Parmesan is not only delicious but also a healthy addition to your meal, offering a good source of vitamins A, C, and K, along with dietary fiber and antioxidants.

Preparation Time

One of the best aspects of this recipe is its quick preparation time. From start to finish, you can have this dish ready in about 15 minutes. That includes the time needed to preheat your grill, prepare the asparagus, and grill to perfection. It’s a fantastic option for a quick weeknight dinner or a side dish for your weekend barbecue.

How to Serve

Grilled asparagus with Parmesan can be served in a variety of ways, making it a versatile dish that complements numerous meals. Consider these serving suggestions:

  • As a side dish: Pair it with grilled chicken, steak, or fish for a balanced meal.
  • In a salad: Toss the grilled asparagus with mixed greens, cherry tomatoes, and a light vinaigrette for a refreshing salad.
  • On a platter: Arrange the asparagus on a large platter with other grilled vegetables for a colorful and healthy buffet spread.
  • With pasta: Add it to a simple pasta dish with olive oil, garlic, and additional Parmesan for a delicious vegetarian option.
  • As a topping: Use it as a topping for a homemade pizza, adding a unique twist to your pizza night.

Additional Tips

To ensure your grilled asparagus with Parmesan is a success, keep these tips in mind:

  1. Use fresh Parmesan: Grate your own Parmesan cheese rather than using pre-shredded varieties. Freshly grated cheese melts better and offers superior flavor.
  2. Avoid overcrowding: When grilling the asparagus, ensure they’re in a single layer to promote even cooking and achieve the best grill marks.
  3. Experiment with flavors: Feel free to add a pinch of red pepper flakes for a hint of heat, or drizzle balsamic glaze for a touch of sweetness.
  4. Try different cheeses: While Parmesan is classic, you can experiment with other hard cheeses like Pecorino Romano or Asiago for a different flavor profile.
  5. Keep an eye on the grill: Asparagus cooks quickly, so stay attentive to prevent it from becoming overcooked and mushy.

FAQ Section

Here are some frequently asked questions about grilled asparagus with Parmesan:

  1. Can I use a grill pan if I don’t have an outdoor grill?
    Absolutely! A grill pan works perfectly fine for this recipe. Just make sure to preheat it well and lightly oil it to prevent sticking.
  2. Can I prepare this recipe in advance?
    While it’s best enjoyed fresh, you can prepare the asparagus ahead of time by trimming and seasoning them. Store them in the refrigerator until you’re ready to grill.
  3. What if I don’t have garlic powder?
    You can substitute garlic powder with minced fresh garlic or omit it altogether if you prefer a milder flavor.
  4. Is there a way to make this dish vegan?
    Yes, you can use nutritional yeast as a substitute for Parmesan to keep the dish vegan while still adding a cheesy flavor.
  5. Can I grill other vegetables along with the asparagus?
    Certainly! This recipe pairs well with other grilled vegetables like bell peppers, zucchini, or cherry tomatoes for a vibrant vegetable medley.

Grilled asparagus with Parmesan is more than just a recipe; it’s an invitation to savor the simplicity and elegance of fresh ingredients. Whether you’re an asparagus aficionado or trying it for the first time, this dish promises to delight your taste buds and earn a permanent spot in your culinary repertoire.