Grilled Tofu Steaks with Chimichurri

Grilled Tofu Steaks with Chimichurri is a dish that has taken our family dinners by storm. As someone who’s always on the lookout for recipes that are both healthy and delicious, this one exceeded all expectations. The vibrant flavors of the chimichurri sauce, combined with the hearty texture of the grilled tofu, create a perfect harmony that even the most devoted meat-eaters in my family appreciated. The first time I served this dish, I was met with curious glances followed by nods of approval. It’s now become a staple at our weekly meals, with everyone from my kids to my grandparents eagerly anticipating its appearance on the dining table.

Ingredients

The key to making Grilled Tofu Steaks with Chimichurri lies in its fresh ingredients. Here’s what you’ll need:

  • 1 block of firm tofu (about 14 ounces), drained and pressed
  • 1/4 cup of olive oil
  • 2 tablespoons of soy sauce
  • 1 tablespoon of balsamic vinegar
  • 2 cloves of garlic, minced
  • 1 teaspoon of smoked paprika
  • 1/2 teaspoon of black pepper
  • For the Chimichurri sauce:
    • 1 cup of fresh parsley, finely chopped
    • 1/4 cup of fresh cilantro, finely chopped
    • 1/4 cup of olive oil
    • 2 tablespoons of red wine vinegar
    • 2 cloves of garlic, minced
    • 1 teaspoon of red pepper flakes
    • Salt and pepper to taste

Instructions

Creating this delightful dish is straightforward and rewarding. Start by preparing the tofu. After draining and pressing the tofu to remove excess moisture, slice it into thick steaks. In a shallow dish, whisk together olive oil, soy sauce, balsamic vinegar, minced garlic, smoked paprika, and black pepper. Add the tofu steaks to the marinade and let them sit for at least 30 minutes, turning occasionally to ensure they soak up all the flavors.

While the tofu marinates, prepare the chimichurri sauce. In a bowl, combine the finely chopped parsley and cilantro with olive oil, red wine vinegar, minced garlic, and red pepper flakes. Season with salt and pepper to taste. Set the sauce aside to allow the flavors to meld.

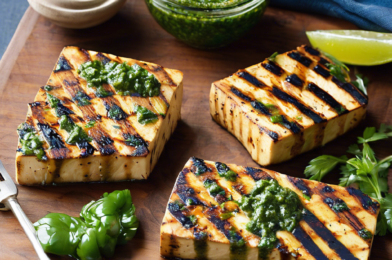
Once the tofu has marinated, preheat your grill to medium-high heat. Grill the tofu steaks for about 5-7 minutes on each side, or until they develop a nice char and are heated through. Serve the grilled tofu steaks hot, generously drizzled with the chimichurri sauce. This dish pairs wonderfully with a side of grilled vegetables or a fresh salad.

Nutrition Facts

This recipe serves four, with each serving containing approximately 250 calories. The nutritional benefits of this dish are significant, offering a high protein content from the tofu, healthy fats from the olive oil, and a variety of vitamins and minerals from the fresh herbs and spices. It’s a meal that fits well into a balanced diet, providing both sustenance and satisfaction.

Preparation Time

The total preparation time for Grilled Tofu Steaks with Chimichurri is around 45 minutes, including 30 minutes of marinating time. This makes it an excellent option for a weeknight dinner, allowing you to prepare other elements of your meal while the tofu absorbs all the flavors of the marinade.

How to Serve

  • Serve the grilled tofu steaks with a vibrant side salad for a refreshing meal.
  • Pair with grilled vegetables like zucchini, bell peppers, and asparagus for a complete dish.
  • Top the tofu with extra chimichurri sauce for an added burst of flavor.
  • Serve alongside quinoa or brown rice for a more filling meal.
  • Garnish with lemon wedges for a zesty finish.

Additional Tips

Tip 1: Ensure that the tofu is well-pressed to remove as much moisture as possible. This will help it absorb the marinade better and achieve a firmer texture when grilled.

Tip 2: If you prefer a spicier kick, increase the amount of red pepper flakes in the chimichurri sauce.

Tip 3: For a smokier flavor, consider adding a dash of liquid smoke to the marinade.

Tip 4: Use fresh herbs for the chimichurri sauce to ensure a bright, aromatic flavor.

Tip 5: If you’re short on time, prepare the chimichurri sauce a day in advance to enhance its flavors.

FAQ Section

Q1: Can I use a different type of tofu?

A1: Yes, while firm tofu is recommended for its texture, extra-firm tofu can also be used. Just ensure it’s well-pressed to remove excess moisture.

Q2: Is it possible to bake the tofu instead of grilling?

A2: Absolutely. Preheat your oven to 400°F (200°C) and bake the marinated tofu on a parchment-lined baking sheet for about 25-30 minutes, flipping halfway through.

Q3: Can I store leftover chimichurri sauce?

A3: Yes, store any leftover chimichurri sauce in an airtight container in the refrigerator for up to one week.

Q4: What other dishes can I serve with chimichurri sauce?

A4: Chimichurri sauce pairs well with grilled meats, roasted vegetables, or as a topping for sandwiches and wraps.

Q5: Can I make this dish vegan?

A5: This recipe is already vegan, as it uses plant-based ingredients exclusively. Just ensure the soy sauce used is also vegan-friendly.

Vegetable Paella with Saffron

As I savored the last spoonful of the vibrant Vegetable Paella with Saffron, I couldn’t help but smile at the satisfaction it brought to my family. This dish, with its aromatic saffron-infused rice and a rainbow of vegetables, had everyone at the table reaching for seconds. The subtle yet profound flavors of saffron intertwined beautifully with the fresh vegetables, creating a symphony of taste and texture that delighted both the palate and the eye. Whether you’re a seasoned cook or a kitchen novice, this recipe promises a delightful culinary adventure. Let’s dive into the details of making this exquisite dish.

Ingredients

To create this delightful Vegetable Paella with Saffron, you will need the following ingredients:

  • 1/4 teaspoon saffron threads
  • 2 cups vegetable broth
  • 2 tablespoons olive oil
  • 1 onion, finely chopped
  • 3 garlic cloves, minced
  • 1 red bell pepper, diced
  • 1 yellow bell pepper, diced
  • 1 zucchini, sliced
  • 1 cup cherry tomatoes, halved
  • 1 cup peas, fresh or frozen
  • 1 1/2 cups Arborio rice
  • 1 teaspoon smoked paprika
  • Salt and pepper to taste
  • Fresh parsley, chopped, for garnish
  • Lemon wedges for serving

Instructions

Follow these steps to prepare your Vegetable Paella with Saffron:

  1. Begin by soaking the saffron threads in a small bowl with a few tablespoons of warm vegetable broth. Allow it to steep for about 10 minutes to release its color and aroma.
  2. In a large paella pan or a wide, shallow skillet, heat the olive oil over medium heat. Add the chopped onion and sauté until it becomes translucent, about 5 minutes.
  3. Add the minced garlic to the pan and sauté for another minute, until fragrant.
  4. Stir in the diced bell peppers and zucchini, cooking until they soften slightly, around 5 minutes.
  5. Add the Arborio rice to the pan, stirring to coat the grains with the oil and vegetables.
  6. Pour in the remaining vegetable broth, along with the saffron-infused broth, cherry tomatoes, peas, and smoked paprika. Stir to combine all the ingredients.
  7. Season with salt and pepper, then reduce the heat to low. Allow the paella to simmer, uncovered, for about 20-25 minutes, or until the rice is tender and the liquid is absorbed.
  8. Once cooked, remove the pan from the heat. Let it sit for a few minutes before garnishing with fresh parsley and serving with lemon wedges.

Nutrition Facts

This recipe serves 4 and contains approximately 350 calories per serving. It’s a wholesome dish packed with nutrients, providing a good source of vitamins and antioxidants from the variety of vegetables used.

Preparation Time

Preparing this Vegetable Paella with Saffron takes about 15 minutes for chopping and prepping the ingredients, with an additional 30 minutes of cooking time. In total, you can have this delicious meal on the table in 45 minutes, making it perfect for a weeknight dinner or a leisurely weekend meal.

How to Serve

Here are a few serving suggestions to enhance your paella experience:

  • Serve the paella directly from the pan for an authentic presentation.
  • Pair it with a crisp green salad dressed in a light vinaigrette.
  • Add a dollop of aioli on the side for a creamy contrast.
  • Accompany with a glass of chilled Spanish white wine like Albariño.
  • For a heartier meal, serve with a side of crusty bread to soak up the flavorful juices.

Additional Tips

Here are some additional tips to ensure your paella turns out perfect:

  1. Use a wide, shallow pan: This ensures even cooking and allows the rice to form a crispy layer at the bottom, known as ‘socarrat’.
  2. Don’t stir the rice: Once you’ve added the broth, avoid stirring to allow the socarrat to develop.
  3. Experiment with vegetables: Feel free to add or substitute with other seasonal vegetables like artichokes or green beans.
  4. Adjust the seasoning: Taste and adjust the salt and pepper according to your preference before serving.
  5. Consider a paella burner: If you love paella, investing in a paella burner can help you achieve perfect results every time.

FAQ Section

Here are some frequently asked questions about Vegetable Paella with Saffron:

  1. Can I make this paella ahead of time?
  2. Yes, you can prepare the paella ahead of time and reheat it gently on the stove. Add a splash of water to prevent it from drying out.

  3. What can I use instead of saffron?
  4. If saffron is unavailable, you can use turmeric for color, though it won’t replicate the unique flavor of saffron.

  5. Is Arborio rice necessary?
  6. Arborio rice is preferred for its ability to absorb flavors and maintain a firm texture. However, you can use other short-grain rice varieties if needed.

  7. Can I add protein to this dish?
  8. Absolutely! Feel free to add chickpeas or tofu for additional protein, or even shrimp if you prefer a non-vegetarian version.

  9. How do I store leftovers?
  10. Store any leftovers in an airtight container in the refrigerator for up to 3 days. Reheat gently before serving.

Mushroom and Spinach Risotto

There’s something incredibly comforting about a dish that combines creamy textures with rich, earthy flavors, and the mushroom and spinach risotto is precisely that kind of magic on a plate. I first stumbled upon this recipe during a chilly autumn evening when I was in search of a meal that could warm the soul and fill the belly. My family, admittedly not the biggest fans of mushrooms, were initially skeptical. However, the aroma wafting through the house as the risotto cooked quickly won them over. By the time we sat down to dinner, the skepticism had turned into eagerness, and after the first bite, it was clear that this mushroom and spinach risotto was a hit. The creaminess of the risotto, balanced by the earthiness of the mushrooms and the subtle bitterness of the spinach, created a harmony of flavors that even the most hesitant members of my family couldn’t resist.

Ingredients

The key to a great risotto lies in its ingredients, and this recipe is no exception. To start, you’ll need:

  • 1 cup of Arborio rice
  • 2 tablespoons of olive oil
  • 1 medium onion, finely chopped
  • 2 cloves of garlic, minced
  • 1 cup of mushrooms, sliced (button, cremini, or shiitake work well)
  • 4 cups of vegetable broth
  • 2 cups of fresh spinach, washed and roughly chopped
  • 1/2 cup of grated Parmesan cheese
  • Salt and pepper to taste
  • 1/4 cup of dry white wine (optional)
  • 1 tablespoon of butter

Instructions

Creating the perfect risotto is an exercise in patience and attention. Here’s how you can make this delectable mushroom and spinach risotto:

  1. Begin by heating the vegetable broth in a pot over low heat. This is crucial as adding cold broth to the risotto will slow down the cooking process.
  2. In a large pan or skillet, heat the olive oil over medium heat. Add the chopped onion and garlic, sautéing until the onion becomes translucent and the mixture is fragrant, about 3-4 minutes.
  3. Add the sliced mushrooms to the pan, cooking until they release their moisture and begin to brown, around 5-7 minutes. This step allows the mushrooms to caramelize, enhancing their earthy flavor.
  4. Stir in the Arborio rice, ensuring each grain is well-coated with the oil and mushroom mixture. Toasting the rice for a minute or two will help develop the risotto’s characteristic nuttiness.
  5. If using, pour in the white wine, stirring constantly until it is absorbed. The wine adds a depth of flavor that complements the mushrooms perfectly.
  6. Begin adding the warm vegetable broth, one ladle at a time, allowing the rice to absorb the liquid before adding more. Stir frequently, ensuring the rice cooks evenly. This process will take about 18-20 minutes.
  7. When the rice is al dente and creamy, stir in the chopped spinach and butter, allowing the spinach to wilt.
  8. Remove the pan from heat and stir in the grated Parmesan cheese. Taste and season with salt and pepper as needed.
  9. Cover the pan with a lid and let the risotto sit for a couple of minutes before serving. This resting time allows the flavors to meld together beautifully.

Nutrition Facts

This recipe serves four people, and each serving contains approximately 350 calories. These values represent a hearty yet balanced meal, rich in flavor and nutrients, making it a perfect option for dinner that won’t leave you feeling guilty.

Preparation Time

From start to finish, this mushroom and spinach risotto takes about 45 minutes to prepare. The majority of this time is spent stirring and adding broth, so it’s an excellent opportunity to enjoy the therapeutic nature of cooking.

How to Serve

Serving risotto is an art in itself, as much as the cooking process. Here’s how you can make the most of your dish:

  • Garnish with Fresh Herbs: A sprinkle of fresh parsley or chives can add a burst of color and freshness.
  • Pair with a Salad: A light, crisp salad with a simple vinaigrette complements the rich risotto beautifully.
  • Add a Protein: For a more substantial meal, consider serving with grilled chicken or shrimp.
  • A Side of Crusty Bread: Use bread to mop up the creamy goodness left on the plate.
  • Wine Pairing: A chilled glass of Sauvignon Blanc or a light Pinot Noir pairs wonderfully with this dish.

Additional Tips

Creating the perfect risotto can be a rewarding experience. Here are some additional tips to ensure your mushroom and spinach risotto turns out perfectly every time:

  1. Use Warm Broth: Always keep your broth warm to ensure the risotto cooks evenly and the texture remains creamy.
  2. Don’t Rush It: The key to risotto is patience. Take your time adding the broth, allowing the rice to absorb the liquid fully.
  3. Use Quality Parmesan: Grating your own cheese from a block of high-quality Parmesan can make a significant difference in flavor.
  4. Stir Constantly: This helps release the starches in the rice, creating that creamy consistency risotto is known for.
  5. Experiment with Mushrooms: Don’t be afraid to try different types of mushrooms to find your favorite flavor combination.

FAQ Section

As with any recipe, questions often arise. Here are some frequently asked questions about mushroom and spinach risotto:

  1. Can I make risotto with brown rice? While traditional risotto uses Arborio rice for its starchiness and creaminess, you can use brown rice. However, note that it will have a different texture and may require more liquid and time to cook.
  2. Can I make this risotto vegan? Yes, you can make it vegan by omitting the Parmesan cheese and butter or using vegan alternatives. Nutritional yeast can be used as a substitute for Parmesan.
  3. How do I store leftover risotto? Store any leftover risotto in an airtight container in the refrigerator for up to three days. Reheat gently on the stovetop or microwave, adding a bit of broth or water to loosen the texture.
  4. Can I freeze risotto? Freezing risotto is not recommended as it can alter the creamy texture once thawed. However, if necessary, freeze it in portioned airtight containers and thaw in the refrigerator before reheating.
  5. What can I use instead of white wine? If you prefer not to use wine, you can substitute it with an equal amount of broth or a splash of lemon juice for acidity.

Lentil and Vegetable Shepherd’s Pie

Lentil and Vegetable Shepherd’s Pie is a dish that has woven itself into the fabric of comfort cooking, offering a hearty and satisfying meal that resonates with both traditionalists and modern-day food enthusiasts. This vegetarian version of the classic shepherd’s pie replaces meat with nutritious lentils, offering a wholesome alternative that retains all the comforting qualities of the original. When I first prepared this recipe, I was unsure how my family would react to the absence of meat. To my delight, they embraced it wholeheartedly, savoring each bite and appreciating the rich flavors and textures. The dish became an instant favorite, often requested for family dinners and gatherings. The combination of earthy lentils, vibrant vegetables, and creamy mashed potatoes creates a symphony of flavors that is both nourishing and comforting.

Ingredients

The success of any dish lies in the quality and selection of its ingredients. For this Lentil and Vegetable Shepherd’s Pie, you will need:

  • 1 cup of dried green or brown lentils, rinsed and drained
  • 2 cups of vegetable broth
  • 1 tablespoon of olive oil
  • 1 large onion, finely chopped
  • 2 cloves of garlic, minced
  • 2 carrots, diced
  • 1 cup of peas, fresh or frozen
  • 1 cup of corn kernels, fresh or frozen
  • 1 tablespoon of tomato paste
  • 1 teaspoon of dried thyme
  • 1 teaspoon of dried rosemary
  • Salt and pepper to taste
  • 4 large potatoes, peeled and quartered
  • 1/4 cup of milk or a plant-based alternative
  • 2 tablespoons of butter or a plant-based spread

Instructions

Creating this Lentil and Vegetable Shepherd’s Pie involves several steps, each contributing to the harmonious blend of flavors. Begin by cooking the lentils. In a large saucepan, combine the rinsed lentils with vegetable broth. Bring to a boil over medium-high heat, then reduce the heat and let it simmer for about 20 to 25 minutes, until the lentils are tender. Drain any excess liquid and set the lentils aside.

While the lentils cook, heat the olive oil in a large skillet over medium heat. Add the chopped onion and sauté for about 5 minutes, until the onion becomes translucent and aromatic. Stir in the minced garlic and cook for another minute. Add the diced carrots, peas, and corn to the skillet, stirring to combine all the vegetables.

Incorporate the tomato paste, dried thyme, and rosemary into the vegetable mixture. Season with salt and pepper to taste. Cook for another 5 minutes, allowing the flavors to meld together. Stir in the cooked lentils and remove the skillet from heat.

While the lentil mixture is cooling, prepare the mashed potato topping. In a large pot, cover the peeled and quartered potatoes with water and bring to a boil. Cook for 15 to 20 minutes, until the potatoes are fork-tender. Drain the potatoes and return them to the pot. Add the milk and butter, mashing the potatoes until they are smooth and creamy. Season with salt and pepper to taste.

Preheat your oven to 375°F (190°C). Spread the lentil and vegetable mixture evenly in a baking dish. Top with the mashed potatoes, spreading them smoothly with a spatula. Use a fork to create decorative ridges on the surface of the potatoes.

Place the baking dish in the preheated oven and bake for 25 to 30 minutes, until the potatoes are golden brown and the filling is bubbling. Remove from the oven and let it cool for a few minutes before serving.

Nutrition Facts

This recipe serves 6 people, making it a perfect dish for family gatherings or meal prepping for the week. Each serving contains approximately 350 calories, providing a balanced meal that is both satisfying and nutritious. With a generous portion of protein from the lentils and fiber from the vegetables, this dish is a wholesome and hearty option for vegetarians and meat-eaters alike.

Preparation Time

The preparation of this Lentil and Vegetable Shepherd’s Pie is straightforward but requires a bit of time and patience. From start to finish, expect to spend about 1 hour and 15 minutes in the kitchen. This includes 25 minutes of active preparation where you will chop, sauté, and assemble the ingredients, and approximately 50 minutes of cooking time for the lentils, vegetables, and baking.

How to Serve

Serving Lentil and Vegetable Shepherd’s Pie is as delightful as preparing it. Here are a few serving suggestions to enhance your dining experience:

  • Serve hot, directly from the oven, for the best flavor and texture.
  • Pair it with a fresh green salad dressed with a light vinaigrette for added freshness.
  • Include a side of crusty bread to soak up the delicious sauce.
  • Top with a sprinkle of freshly chopped parsley for a vibrant garnish.
  • For a spicy twist, add a dash of hot sauce or chili flakes on top before serving.

Additional Tips

Here are some tips to ensure your Lentil and Vegetable Shepherd’s Pie turns out perfectly every time:

  • Choose the right lentils: Green or brown lentils hold their shape well during cooking and are ideal for this recipe. Avoid using red lentils as they tend to become mushy.
  • Enhance the flavor: Add a splash of red wine to the vegetable mixture for a deeper, more complex flavor.
  • Make it vegan: Substitute the butter with olive oil or a plant-based spread, and use a non-dairy milk alternative for the mashed potatoes.
  • Prepare in advance: You can make the lentil and vegetable filling a day ahead. Store it in the refrigerator and assemble the pie just before baking.
  • Freeze for later: This dish freezes well. Prepare the pie in a freezer-safe dish, cover tightly, and freeze for up to three months. Thaw in the refrigerator overnight before baking.

FAQ Section

Here are some frequently asked questions about Lentil and Vegetable Shepherd’s Pie:

  • Can I use canned lentils instead of dried? Yes, you can use canned lentils to save time. Be sure to rinse and drain them well before adding them to the vegetable mixture.
  • What other vegetables can I include? Feel free to add other vegetables like mushrooms, spinach, or bell peppers to the filling for extra flavor and nutrition.
  • How can I make the mashed potatoes extra creamy? To achieve ultra-creamy mashed potatoes, use a potato ricer for a smoother texture and consider adding a bit more butter or cream.
  • Is it possible to make this dish gluten-free? Yes, this recipe is naturally gluten-free as long as you use gluten-free vegetable broth and check any packaged ingredients for hidden gluten.
  • How long will leftovers last in the fridge? Store any leftovers in an airtight container in the refrigerator for up to 4 days. Reheat in the oven or microwave until heated through.

Baked Cod with Lemon and Herbs

The aroma of baked cod with lemon and herbs wafting through my kitchen was a delightful surprise for my family. As an avid cook and food enthusiast, I’m always on the lookout for recipes that are not only healthy but also pack a punch in terms of flavor. This particular dish did not disappoint. It’s a perfect blend of simplicity and sophistication, making it ideal for a weekday dinner or even a special occasion. My family, known for their discerning palates, couldn’t get enough of it. The flaky, tender cod paired with the zesty lemon and fragrant herbs was a hit, and it has quickly become one of our household favorites.

Ingredients

Creating this delicious baked cod with lemon and herbs is both straightforward and rewarding. Here is a detailed list of ingredients that you will need:

  • 4 cod fillets (about 6 ounces each)
  • 2 tablespoons olive oil
  • 2 lemons (one juiced, one sliced)
  • 4 cloves of garlic, minced
  • Salt and freshly ground black pepper to taste
  • 1 teaspoon dried thyme
  • 1 teaspoon dried oregano
  • 1 teaspoon dried rosemary
  • Fresh parsley for garnish

Instructions

Cooking this dish is as enjoyable as eating it. Follow these steps to create a mouth-watering baked cod:

  1. Preheat your oven to 400°F (200°C). This ensures the cod cooks evenly and retains its moisture.
  2. Prepare the baking dish by drizzling olive oil on the bottom. This prevents the fish from sticking and adds a layer of flavor.
  3. Arrange the cod fillets in a single layer in the dish. Season them with salt and pepper to taste.
  4. In a small bowl, mix the minced garlic, lemon juice, olive oil, thyme, oregano, and rosemary. This mixture will be the marinade.
  5. Pour the marinade over the cod fillets, ensuring they are well coated.
  6. Place lemon slices on top of the fillets. This adds a beautiful presentation and infuses more citrus flavor.
  7. Bake in the preheated oven for 12-15 minutes or until the fish is opaque and flakes easily with a fork.
  8. Garnish with fresh parsley before serving for a pop of color and freshness.

Nutrition Facts

This baked cod recipe is as nutritious as it is delicious. Here are the nutrition details:

  • Servings: 4
  • Calories per serving: Approximately 250 calories

Preparation Time

The preparation time for this baked cod with lemon and herbs is remarkably quick, making it a convenient option for a healthy meal:

Total Preparation Time: 10 minutes

Cooking Time: 15 minutes

Total Time: 25 minutes

How to Serve

Serving baked cod with lemon and herbs can be as versatile as you wish. Here are some serving suggestions to elevate your dining experience:

  • Serve with a side of roasted vegetables, such as asparagus or Brussels sprouts.
  • Pair with a light and fluffy quinoa salad, dressed with vinaigrette.
  • Accompany with mashed potatoes or a creamy risotto for a more indulgent meal.
  • Offer a freshly baked loaf of crusty bread to soak up the delicious lemon and herb juices.
  • For a light meal, serve alongside a simple green salad dressed with a lemon vinaigrette.

Additional Tips

To ensure your baked cod with lemon and herbs turns out perfectly every time, consider these additional tips:

  1. Choose fresh cod for the best flavor and texture. Fresh fish is less likely to have a “fishy” smell and will cook more evenly.
  2. Don’t overcook the fish. Cod is delicate and can become dry if overcooked. Keep a close eye on it as it bakes.
  3. Experiment with herbs. Feel free to use fresh herbs instead of dried ones for a more vibrant flavor.
  4. Adjust the lemon. If you prefer a less tangy dish, reduce the amount of lemon juice or omit the lemon slices.
  5. Use parchment paper. Lining the baking dish with parchment paper can make cleanup easier and prevent sticking.

FAQ Section

Here are some frequently asked questions about this baked cod with lemon and herbs recipe:

  1. Can I use frozen cod fillets? Yes, you can use frozen fillets. Make sure to thaw them completely and pat them dry before cooking to avoid excess moisture.
  2. What can I substitute for cod? If cod is not available, haddock or halibut can be excellent substitutes in this recipe.
  3. How do I know when the cod is done? The cod is done when it flakes easily with a fork and appears opaque throughout.
  4. Can I add other vegetables to the dish? Absolutely! Adding vegetables like cherry tomatoes or bell peppers can enhance the dish’s flavor and nutritional value.
  5. Is this recipe suitable for meal prep? Yes, baked cod can be stored in the refrigerator for up to 3 days. Reheat gently to maintain its texture.

This baked cod with lemon and herbs is a testament to how simple ingredients can create a dish that is both elegant and comforting. Whether you’re an experienced cook or a beginner, this recipe is approachable and rewarding. So next time you’re looking for a nutritious and flavorful meal, give this baked cod a try. Your taste buds will thank you.

One-Pot Vegetable Jambalaya

There’s nothing quite like the comforting aroma of a hearty jambalaya simmering on the stove, especially when it’s packed with vibrant vegetables and cooked all in one pot. My family has always been a fan of dishes that bring both flavor and convenience to the table, and this one-pot vegetable jambalaya is no exception. The first time I made this dish, the warm, spicy fragrance filled the house, drawing everyone to the kitchen with eager anticipation. By the time we sat down to eat, the excitement was palpable, and each bite delivered on the promise of taste and satisfaction. This recipe quickly became a staple in our dinner rotation, delighting both the young and young at heart with its bold flavors and ease of preparation.

Ingredients

The beauty of this one-pot vegetable jambalaya lies in its simplicity and versatility, making it an ideal dish for both seasoned cooks and kitchen novices. Here’s what you’ll need:

  • 2 tablespoons olive oil
  • 1 onion, diced
  • 1 bell pepper, diced (any color of your choice)
  • 3 cloves garlic, minced
  • 1 cup long-grain rice
  • 2 cups vegetable broth
  • 1 can (14.5 ounces) diced tomatoes, with juices
  • 1 teaspoon smoked paprika
  • 1 teaspoon dried oregano
  • 1/2 teaspoon cayenne pepper (adjust to taste)
  • 1/2 teaspoon dried thyme
  • Salt and pepper to taste
  • 1 zucchini, diced
  • 1 cup frozen peas
  • 1 cup sliced okra (fresh or frozen)
  • 1 cup corn kernels (fresh, frozen, or canned)
  • 1/4 cup fresh parsley, chopped
  • Lemon wedges for serving

Instructions

Cooking this one-pot vegetable jambalaya is as straightforward as it is satisfying. Here’s how to bring this delicious dish to life:

  1. Heat the olive oil in a large pot over medium heat. Add the diced onion and bell pepper, sautéing until they become soft and translucent, about 5 minutes. Stir in the minced garlic and cook for an additional minute until fragrant.
  2. Add the rice to the pot, stirring to coat the grains in the oil and vegetables. Allow the rice to toast slightly, which should take about 2 minutes.
  3. Pour in the vegetable broth and diced tomatoes, including their juices. Stir in the smoked paprika, oregano, cayenne pepper, thyme, salt, and pepper. Bring the mixture to a boil.
  4. Once boiling, reduce the heat to low, cover the pot, and let it simmer for about 15 minutes.
  5. After 15 minutes, add the zucchini, peas, okra, and corn to the pot. Stir to combine, cover, and continue simmering for another 10-15 minutes, or until the rice is cooked through and the vegetables are tender.
  6. Remove the pot from the heat and let it sit, covered, for 5 minutes to allow the flavors to meld together.
  7. Stir in the fresh parsley before serving, and enjoy your jambalaya with a squeeze of fresh lemon juice for a zesty finish.

Nutrition Facts

This hearty dish serves 6 people, offering a balanced meal that is both nutritious and satisfying. Each serving contains approximately 250 calories, making it a great option for those looking to enjoy a lighter, yet filling dinner.

Preparation Time

From start to finish, this one-pot vegetable jambalaya takes about 45 minutes to prepare and cook. The minimal prep work and single pot make it an ideal choice for busy weeknights when time is of the essence, yet you don’t want to compromise on flavor or nutrition.

How to Serve

This versatile dish can be served in a variety of ways to suit different preferences and occasions:

  • As a main course: Serve it in deep bowls with extra lemon wedges on the side for squeezing over the top.
  • With a side of crusty bread: Pair with warm, crusty bread or a baguette to soak up the flavorful juices.
  • Alongside a green salad: Complement the rich flavors of the jambalaya with a fresh, crisp green salad tossed with a light vinaigrette.
  • With a side of avocado: Add slices of ripe avocado for a creamy contrast to the spicy, savory dish.
  • As a buffet item: Ideal for gatherings, serve it as part of a buffet spread, allowing guests to help themselves.

Additional Tips

  1. Adjust the heat: Feel free to modify the amount of cayenne pepper to suit your spice tolerance. For a milder dish, reduce the cayenne, or eliminate it altogether. For a spicier kick, add more or include a diced jalapeño.
  2. Make it a complete meal: For added protein, consider incorporating chickpeas, black beans, or even tofu. These additions can provide extra texture and make the dish even more filling.
  3. Use what’s on hand: One of the best things about this dish is its adaptability. Feel free to swap out the vegetables based on what you have available or what’s in season.
  4. Let it rest: Allowing the jambalaya to rest for a few minutes after cooking helps the flavors to meld together, enhancing the overall taste of the dish.
  5. Double the recipe: This jambalaya is a great candidate for batch cooking. Double the ingredients and store leftovers in the fridge for lunches or quick dinners throughout the week.

FAQ Section

1. Can I make this jambalaya in advance?

Yes, this dish can be made ahead of time and stored in the refrigerator for up to 3 days. Reheat it gently over low heat on the stove, adding a splash of vegetable broth if needed to loosen it up.

2. Can I freeze this jambalaya?

Absolutely! Allow the jambalaya to cool completely before transferring it to airtight containers. It can be frozen for up to 3 months. When ready to eat, thaw it in the refrigerator overnight and reheat as directed above.

3. What can I use instead of rice?

If you’re looking for a rice alternative, quinoa or cauliflower rice can be great substitutes. Both options will require adjustments in cooking time and liquid ratios, so be sure to keep an eye on the dish as it cooks.

4. Is this dish gluten-free?

Yes, this vegetable jambalaya is naturally gluten-free, provided that the ingredients used (such as vegetable broth and any pre-packaged spices) are certified gluten-free.

5. How can I add more protein to this meal?

To increase the protein content, consider adding cooked beans, lentils, or even diced tofu. These ingredients can be stirred in during the final stages of cooking for an extra protein boost.

Spinach and Ricotta Stuffed Shells

Spinach and Ricotta Stuffed Shells is a beloved dish in my household, bringing smiles to the dinner table every time it is served. The combination of creamy ricotta, nutritious spinach, and al dente pasta shells bathed in a rich tomato sauce offers a comforting and satisfying meal that pleases both young and old alike. My family, always eager for Italian-inspired dinners, finds this recipe to be a perfect blend of flavors and textures. The dish is not only delicious but also visually appealing, with its vibrant colors and inviting aroma. It quickly became a favorite, sparking joyful discussions and laughter during dinner time.

Ingredients

To create these delightful Spinach and Ricotta Stuffed Shells, you will need the following ingredients:

  • Jumbo pasta shells: 20-25 shells, cooked al dente.
  • Ricotta cheese: 2 cups, preferably fresh.
  • Fresh spinach: 10 ounces, chopped and wilted.
  • Parmesan cheese: 1 cup, grated.
  • Mozzarella cheese: 1 cup, shredded.
  • Egg: 1 large, lightly beaten.
  • Garlic: 2 cloves, minced.
  • Nutmeg: 1/4 teaspoon, freshly grated.
  • Salt and pepper: To taste.
  • Marinara sauce: 2 cups, homemade or store-bought.
  • Olive oil: 2 tablespoons, for greasing the baking dish.
  • Fresh basil: A handful, for garnish.

Instructions

Follow these steps to prepare Spinach and Ricotta Stuffed Shells:

  1. Preheat your oven to 375°F (190°C). Lightly grease a 9×13 inch baking dish with olive oil.
  2. In a large pot, bring salted water to a boil and cook the jumbo pasta shells until al dente. Drain and set aside to cool slightly.
  3. In a skillet, heat a tablespoon of olive oil over medium heat. Add the minced garlic and sauté until fragrant, about 1 minute. Add the chopped spinach and cook until wilted. Remove from heat and allow to cool.
  4. In a large mixing bowl, combine ricotta cheese, wilted spinach, half of the Parmesan cheese, the egg, nutmeg, salt, and pepper. Mix until well incorporated.
  5. Spread 1 cup of marinara sauce evenly on the bottom of the prepared baking dish.
  6. Fill each pasta shell with the ricotta and spinach mixture using a spoon or a piping bag for ease.
  7. Arrange the stuffed shells in the baking dish, seam side up. Pour the remaining marinara sauce over the shells, ensuring each shell is covered.
  8. Sprinkle the mozzarella cheese and the remaining Parmesan cheese over the top.
  9. Cover the dish with aluminum foil and bake in the preheated oven for 25 minutes. Remove the foil and bake for an additional 10 minutes, or until the cheese is bubbly and golden brown.
  10. Once baked, let the dish cool for a few minutes before serving. Garnish with fresh basil leaves for a burst of flavor and color.

Nutrition Facts

This recipe serves six people, with each serving containing approximately 350 calories. It’s a nourishing meal that offers a good balance of protein, carbohydrates, and fats, making it a wholesome choice for any dinner table.

Preparation Time

The preparation time for Spinach and Ricotta Stuffed Shells is approximately 30 minutes, with an additional 35 minutes required for baking. This makes it an ideal option for a weeknight meal that doesn’t demand extensive time in the kitchen but still delivers on taste and satisfaction.

How to Serve

Here are some suggestions on how to serve your Spinach and Ricotta Stuffed Shells:

  • Pair with a crisp green salad drizzled with a light vinaigrette.
  • Serve alongside garlic bread or crusty baguette slices for a complete meal.
  • Complement with a glass of white wine, such as Pinot Grigio or Sauvignon Blanc.
  • Garnish with extra Parmesan cheese and freshly cracked black pepper for added flavor.
  • Include a side of roasted vegetables, like zucchini or bell peppers, for a nutritious boost.

Additional Tips

Here are some additional tips to enhance your Spinach and Ricotta Stuffed Shells experience:

  1. Use fresh ingredients: Opt for fresh ricotta and spinach for the best flavor and texture.
  2. Prepare ahead: Assemble the shells a day in advance and refrigerate until ready to bake.
  3. Experiment with cheeses: Try adding other cheeses like fontina or asiago for a different flavor profile.
  4. Adjust seasoning: Taste the filling before stuffing the shells and adjust the seasoning as needed.
  5. Freeze for later: This dish freezes well. Prepare and freeze before baking for a convenient future meal.

FAQ Section

  1. Can I use frozen spinach instead of fresh? Yes, you can use frozen spinach. Just be sure to thaw and drain it thoroughly before adding it to the ricotta mixture.
  2. What is the best way to store leftovers? Store leftovers in an airtight container in the refrigerator for up to 3 days. Reheat in the oven or microwave before serving.
  3. Can I make this dish vegan? Yes, substitute ricotta with a plant-based alternative and use vegan cheese. Ensure the pasta shells are also vegan-friendly.
  4. How can I make this dish gluten-free? Use gluten-free pasta shells and ensure all other ingredients are certified gluten-free.
  5. Can I add meat to this recipe? Absolutely! Cooked ground beef or sausage can be added to the filling or layered with the marinara sauce for a heartier version.

Grilled Herb-Marinated Chicken Breast

There’s something undeniably satisfying about preparing and enjoying a homemade meal that brings the family together, and this Grilled Herb-Marinated Chicken Breast recipe does just that. When I first tried this recipe, I was amazed at how the simple combination of fresh herbs and a few pantry staples could transform an ordinary chicken breast into a culinary masterpiece. The aroma of the grill, the sizzle of the chicken, and the vibrant flavors that burst with each bite made it an instant favorite at our dinner table. My family couldn’t get enough of it, and it quickly became a staple in our weekly meal rotation. The best part? It’s both healthy and incredibly easy to prepare, making it a win-win for everyone involved.

Ingredients

To create this flavorful dish, you will need the following ingredients:

  • 4 boneless, skinless chicken breasts
  • 1/4 cup olive oil
  • 2 tablespoons freshly squeezed lemon juice
  • 3 cloves garlic, minced
  • 1 tablespoon fresh rosemary, chopped
  • 1 tablespoon fresh thyme, chopped
  • 1 tablespoon fresh parsley, chopped
  • Salt and pepper to taste

Instructions

Follow these simple steps to prepare the Grilled Herb-Marinated Chicken Breast:

  1. In a small bowl, whisk together the olive oil, lemon juice, minced garlic, rosemary, thyme, parsley, salt, and pepper to create the marinade.
  2. Place the chicken breasts in a resealable plastic bag or a shallow dish, and pour the marinade over them. Ensure the chicken is evenly coated.
  3. Seal the bag or cover the dish and refrigerate for at least 1 hour, or up to 24 hours for a more intense flavor.
  4. Preheat your grill to medium-high heat. Remove the chicken from the marinade and allow any excess to drip off.
  5. Place the chicken breasts on the grill, and cook for 6-7 minutes on each side, or until the internal temperature reaches 165°F (75°C).
  6. Remove the chicken from the grill and let it rest for a few minutes before serving.

Nutrition Facts

This recipe serves 4 and contains approximately 250 calories per serving. It is a healthy, protein-packed option that fits well into a balanced diet.

Preparation Time

The total preparation time for this dish is about 1 hour and 30 minutes, which includes marination time. Active cooking time is approximately 15 minutes.

How to Serve

There are several delightful ways to serve this Grilled Herb-Marinated Chicken Breast:

  • Slice the chicken and serve it over a bed of mixed greens for a refreshing salad.
  • Pair it with roasted vegetables and quinoa for a wholesome dinner.
  • Serve it alongside a creamy garlic mashed potato for a comforting meal.
  • Add the sliced chicken to a wrap with hummus and veggies for a tasty lunch.
  • Top with a drizzle of balsamic glaze for an extra burst of flavor.

Additional Tips

To enhance your cooking experience and the flavor of the dish, keep these tips in mind:

  1. Use fresh herbs whenever possible – Fresh herbs provide a more vibrant flavor compared to dried ones.
  2. Don’t skip the resting time – Allow the chicken to rest after grilling to retain its juices and flavor.
  3. Adjust seasoning to taste – Feel free to modify the amount of salt and pepper to suit your preferences.
  4. Marinate longer for more flavor – If time permits, marinate the chicken overnight for a more robust taste.
  5. Ensure even cooking – Flatten the chicken breasts if needed to ensure they cook evenly on the grill.

FAQ Section

Here are some common questions and answers about this recipe:

  1. Can I use other herbs? – Yes, you can experiment with different herbs like basil or oregano to suit your taste.
  2. Is it possible to bake the chicken instead of grilling? – Absolutely! Bake in a preheated oven at 375°F (190°C) for 25-30 minutes.
  3. What can I use as a substitute for lemon juice? – Lime juice or apple cider vinegar can be used as alternatives.
  4. How do I know when the chicken is cooked? – Use a meat thermometer to ensure the internal temperature reaches 165°F (75°C).
  5. Can I freeze the marinated chicken? – Yes, you can freeze the chicken in the marinade for up to 3 months. Thaw before grilling.

In conclusion, this Grilled Herb-Marinated Chicken Breast recipe is a delightful and versatile dish that is sure to please anyone who tries it. Its simplicity, coupled with the rich flavors of fresh herbs, makes it a perfect choice for any meal. Whether you’re preparing it for a family dinner or a weekend barbecue, this recipe is bound to impress and satisfy. Enjoy!

Vegetable Stir-Fry with Cashews

When it comes to quick and nutritious meals, a vegetable stir-fry with cashews is a go-to in my household. Its vibrant colors and fresh flavors make it an appealing dish for both the eyes and the palate. The crunch of the cashews combined with the tender-crisp vegetables creates a delightful contrast that even the pickiest of eaters enjoy. My family has always been a tough crowd to please when it comes to vegetables, but this recipe has become one of our weeknight favorites. The best part? It’s incredibly easy to make, ensuring that you spend less time in the kitchen and more time enjoying your meal with loved ones.

Ingredients

To create this delicious vegetable stir-fry with cashews, you’ll need the following ingredients:

  • 1 cup of raw cashews
  • 2 tablespoons of vegetable oil
  • 1 red bell pepper, sliced
  • 1 yellow bell pepper, sliced
  • 1 cup of broccoli florets
  • 1 cup of snap peas
  • 2 carrots, thinly sliced
  • 3 cloves of garlic, minced
  • 1 tablespoon of fresh ginger, grated
  • 3 tablespoons of soy sauce
  • 2 tablespoons of hoisin sauce
  • 1 tablespoon of rice vinegar
  • 1 tablespoon of sesame oil
  • 2 green onions, sliced
  • Sesame seeds for garnish

Instructions

To prepare your vegetable stir-fry with cashews, follow these simple steps:

  1. Start by toasting the cashews in a large pan over medium heat. Stir frequently until they are golden brown, about 3-5 minutes. Remove them from the pan and set aside.
  2. In the same pan, heat the vegetable oil over medium-high heat. Add the garlic and ginger, sautéing until fragrant.
  3. Add the sliced bell peppers, broccoli, snap peas, and carrots to the pan. Stir-fry the vegetables for about 5-7 minutes, or until they are tender-crisp.
  4. In a small bowl, whisk together the soy sauce, hoisin sauce, rice vinegar, and sesame oil. Pour the sauce over the vegetables and stir to coat evenly.
  5. Return the toasted cashews to the pan and toss everything together.
  6. Remove the pan from heat and sprinkle the sliced green onions and sesame seeds over the top. Serve immediately.

Nutrition Facts

This recipe serves four, with each serving containing approximately 250 calories. It’s a wholesome meal full of vitamins, healthy fats, and plant-based proteins, making it a great choice for anyone looking to maintain a balanced diet.

Preparation Time

One of the best things about this vegetable stir-fry with cashews is its quick preparation time. From start to finish, you can have this dish ready in just 30 minutes, making it perfect for busy weeknights or when you want a nutritious meal without the hassle.

How to Serve

Consider serving this dish in one of the following ways for a well-rounded meal:

  • Over a bed of steamed jasmine rice for a traditional touch.
  • With quinoa for added protein and fiber.
  • On its own as a light, low-carb option.
  • Alongside grilled chicken or shrimp for an extra protein boost.
  • With a side of miso soup or a simple green salad.

Additional Tips

Here are some tips to make your stir-fry even better:

  1. Prep ahead: Chop all your vegetables in advance to streamline the cooking process.
  2. Use a wok: If you have one, use a wok for even cooking and authentic flavor.
  3. Experiment with veggies: Feel free to add or substitute other vegetables such as mushrooms, zucchini, or baby corn.
  4. Adjust the sauce: Taste the sauce before adding it to the stir-fry and adjust the flavors to your liking.
  5. Spice it up: Add a dash of chili flakes or a splash of sriracha for some heat.

FAQ Section

Here are some frequently asked questions about this recipe:

Q: Can I use roasted cashews instead of raw?

A: Yes, you can use roasted cashews, but be sure to adjust the toasting time accordingly to avoid burning.

Q: Is it necessary to use both soy sauce and hoisin sauce?

A: While both sauces contribute to the depth of flavor, you can substitute one with more of the other if needed, but expect a slight change in taste.

Q: Can I make this dish gluten-free?

A: Absolutely! Simply use gluten-free soy sauce or tamari to ensure the dish remains gluten-free.

Q: How can I store leftovers?

A: Store any leftovers in an airtight container in the refrigerator for up to three days. Reheat in a pan over medium heat for the best results.

Q: Can I add tofu to this stir-fry?

A: Yes, adding tofu is a great way to increase the protein content. Simply cube firm tofu and add it to the pan along with the vegetables.

Chicken Alfredo Pasta

There’s something undeniably comforting about a steaming plate of Chicken Alfredo Pasta. When I first tried this dish, it was a hit with my entire family. The creamy sauce, tender chicken, and perfectly cooked pasta created a symphony of flavors and textures that left everyone at the table asking for seconds. It’s a recipe that not only satisfies the taste buds but also warms the soul, making it a staple in our household meal rotation.

Ingredients

To make this delicious Chicken Alfredo Pasta, you will need the following ingredients:

  • 2 boneless, skinless chicken breasts: Cut into bite-sized pieces.
  • 1 pound of fettuccine pasta: You can use any pasta you like, but fettuccine is the traditional choice.
  • 2 tablespoons of olive oil: For cooking the chicken.
  • 4 cloves of garlic: Minced for that aromatic kick.
  • 1 cup of heavy cream: The base of the Alfredo sauce.
  • 1 cup of grated Parmesan cheese: Freshly grated for the best flavor.
  • 1 tablespoon of butter: Adds richness to the sauce.
  • Salt and pepper to taste: Essential seasonings.
  • Chopped parsley (optional): For garnish.

Instructions

Creating this mouthwatering Chicken Alfredo Pasta is straightforward and rewarding. Follow these steps to culinary success:

Step 1: Prepare the Pasta

Start by bringing a large pot of salted water to a boil. Add the fettuccine pasta and cook according to the package instructions until al dente. Drain and set aside.

Step 2: Cook the Chicken

In a large skillet, heat the olive oil over medium-high heat. Add the chicken pieces and cook until they are golden brown and cooked through, about 5-7 minutes. Remove the chicken from the skillet and set aside.

Step 3: Make the Alfredo Sauce

In the same skillet, add the minced garlic and sauté for about 1 minute until fragrant. Reduce the heat to medium and pour in the heavy cream. Add the butter and stir until melted. Gradually stir in the Parmesan cheese, allowing it to melt and thicken the sauce. Season with salt and pepper to taste.

Step 4: Combine and Serve

Add the cooked pasta and chicken back into the skillet, tossing everything to coat with the sauce. Cook for an additional 2-3 minutes until everything is heated through. Garnish with chopped parsley if desired. Serve hot and enjoy!

Nutrition Facts

This recipe serves approximately 4 people. Each serving contains about 650 calories, making it a hearty meal that is sure to satisfy your hunger.

Preparation Time

This Chicken Alfredo Pasta can be prepared in about 30 minutes, making it an excellent choice for a weeknight dinner when time is of the essence but you still want something delicious and wholesome.

How to Serve

Chicken Alfredo Pasta can be served with various accompaniments to enhance the dining experience:

  • Pair it with a fresh green salad for a balanced meal.
  • Serve with garlic bread to soak up the creamy sauce.
  • Add a side of steamed vegetables for a nutritious touch.
  • Top with extra Parmesan cheese for those who love a cheesy finish.
  • Include a glass of white wine to complement the dish’s rich flavors.

Additional Tips

Here are some additional tips to ensure your Chicken Alfredo Pasta is perfect every time:

  1. Use fresh ingredients: Fresh garlic and Parmesan cheese make a big difference in flavor.
  2. Don’t overcook the pasta: Al dente pasta holds the sauce better and maintains a pleasant texture.
  3. Adjust the sauce consistency: If the sauce is too thick, add a little pasta water to reach your desired consistency.
  4. Season as you go: Taste and adjust seasonings throughout the cooking process for the best flavor.
  5. Experiment with herbs: Add herbs like basil or thyme for an extra layer of flavor.

FAQ Section

Q: Can I use a different type of pasta?

A: Absolutely! While fettuccine is traditional, you can use penne, spaghetti, or any pasta you prefer.

Q: Is there a substitute for heavy cream?

A: You can use half-and-half or whole milk, but the sauce will be less rich. For a dairy-free option, try coconut cream.

Q: How can I store leftovers?

A: Store leftovers in an airtight container in the refrigerator for up to 3 days. Reheat gently on the stove or in the microwave.

Q: Can I add vegetables to this dish?

A: Yes! Broccoli, mushrooms, or spinach make great additions to Chicken Alfredo Pasta.

Q: What can I do if my sauce is too thick?

A: Gradually add some reserved pasta water or more cream until you reach the desired consistency.