Baked Kale Chips

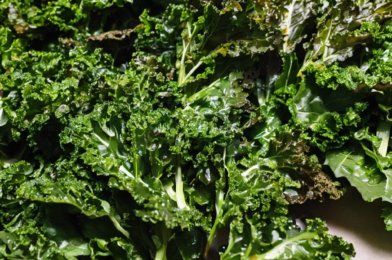
There’s something incredibly satisfying about discovering a healthy snack that everyone in the family enjoys. That was the case when I first made baked kale chips. The crunchiness, combined with a slight hint of salt, made these chips an instant hit in our household. Even my kids, who usually turn their noses up at anything green, found themselves asking for more. It’s a recipe that not only satisfied our taste buds but also provided a nutritious alternative to traditional potato chips, making it an excellent choice for family movie nights or afternoon snacks.

Ingredients

The beauty of baked kale chips lies in their simplicity, requiring only a handful of ingredients that are likely already in your kitchen. Here’s what you’ll need:

  • 1 bunch of kale
  • 1 tablespoon olive oil
  • 1 teaspoon sea salt
  • Optional: 1 tablespoon nutritional yeast for a cheesy flavor
  • Optional: 1/2 teaspoon garlic powder for a savory kick

Instructions

Making baked kale chips is a straightforward process that even novice cooks can master. Follow these steps to achieve perfectly crispy chips:

  1. Preheat your oven to 300°F (150°C).
  2. Wash the kale thoroughly and dry it completely to prevent sogginess.
  3. Remove the kale leaves from the thick stems and tear them into bite-sized pieces.
  4. Place the kale pieces in a large bowl and drizzle with olive oil, then sprinkle with sea salt. Add any optional seasonings at this point.
  5. Massage the oil and seasonings into the kale to ensure even coating.
  6. Spread the kale pieces in a single layer on a baking sheet lined with parchment paper.
  7. Bake for 20-25 minutes, or until the edges of the kale are crisp but not burnt.
  8. Allow to cool before serving.

Nutrition Facts

This recipe serves 4 and each serving contains approximately:

  • Calories: 58
  • Fat: 4g
  • Carbohydrates: 5g
  • Protein: 2g

Preparation Time

Preparing baked kale chips is a quick process, making it a perfect snack option for busy days. From start to finish, you can expect the full preparation and cooking time to be around 30 minutes, with the majority of this time being hands-off as the kale bakes in the oven.

How to Serve

  • As a standalone snack on a casual afternoon.
  • As a crunchy topping for soups or salads.
  • Paired with a variety of dips such as hummus or guacamole.
  • As a healthier substitute for croutons in a Caesar salad.

Additional Tips

Here are some key tips that can enhance your kale chips:

  1. Dry Thoroughly: Ensure the kale is completely dry before applying oil. Excess moisture can lead to soggy chips.
  2. Use Parchment Paper: This prevents sticking and ensures even baking.
  3. Don’t Overcrowd: Give each piece of kale enough space on the baking sheet for air to circulate, aiding in crispiness.
  4. Experiment with Flavors: Try different seasonings like smoked paprika or chili powder for variety.
  5. Store Properly: Keep them in an airtight container at room temperature to maintain their crisp texture.

FAQ Section

Q: Can I use a different type of kale for this recipe?

A: Yes, both curly kale and lacinato (dinosaur) kale work well. Just be sure to adjust the cooking time slightly if needed.

Q: Why did my kale chips turn out soggy?

A: Sogginess often results from not drying the kale thoroughly or overcrowding the baking sheet.

Q: Can I make these chips in an air fryer?

A: Absolutely! Air fryers can make kale chips even crispier. Set the air fryer to 300°F and check for doneness after 10 minutes.

Q: How long do kale chips last?

A: When stored in an airtight container, they typically last 2-3 days at room temperature.

Q: Can I add other vegetables to the mix?

A: While you can experiment with other leafy greens, kale tends to hold up best during the baking process due to its sturdy leaves.

In conclusion, baked kale chips are a delightful, guilt-free snack that offers both flavor and nutrition. Whether you’re looking to satisfy a crunchy craving or introduce more greens into your diet, this recipe is a fantastic choice. Plus, with the ability to customize seasonings and flavors, you’ll never get bored. Enjoy your homemade kale chips and relish in the knowledge that you’re snacking smart!

Stuffed Bell Peppers with Quinoa

When I first stumbled upon the recipe for Stuffed Bell Peppers with Quinoa, I was intrigued but somewhat skeptical. After all, I had tried various stuffed pepper recipes before, but none had quite lived up to my expectations. However, this particular version, with its unique combination of ingredients, seemed promising. So, one weekend, I decided to give it a shot and invited my family over for a taste test. The results were nothing short of delightful. The peppers were beautifully roasted, with a perfect balance of flavors and textures. The quinoa provided a wonderful nutty background that complemented the rich, savory filling. My family, who can sometimes be a tough crowd to please, absolutely adored them. It was a unanimous decision that this recipe was a keeper, and it has since become a staple in our home-cooked meal rotations.

Ingredients

To recreate this culinary delight at home, you will need the following ingredients:

  • 4 large bell peppers (any color of your choice)
  • 1 cup of quinoa
  • 2 cups of vegetable broth
  • 1 tablespoon of olive oil
  • 1 medium onion, chopped
  • 2 cloves of garlic, minced
  • 1 can (15 oz) of black beans, drained and rinsed
  • 1 cup of corn kernels (fresh, frozen, or canned)
  • 1 teaspoon of cumin
  • 1 teaspoon of chili powder
  • Salt and pepper to taste
  • 1 cup of shredded cheese (cheddar or your preferred variety)
  • Fresh cilantro for garnish
  • Lime wedges for serving

Instructions

Start by preheating your oven to 375°F (190°C). While the oven is heating, prepare the quinoa by rinsing it under cold water to remove any bitterness. In a medium saucepan, combine the rinsed quinoa with 2 cups of vegetable broth. Bring it to a boil, then reduce the heat to low and cover. Let it simmer for about 15 minutes, or until all the liquid is absorbed and the quinoa is tender. Fluff the quinoa with a fork and set aside.

While the quinoa is cooking, prepare the bell peppers. Cut the tops off the peppers and remove the seeds and membranes. Lightly oil a baking dish and arrange the peppers cut side up, ready to be filled.

In a large skillet, heat the olive oil over medium heat. Add the chopped onion and sauté until it becomes translucent. Stir in the minced garlic and cook for another minute until fragrant. Add the black beans, corn, cumin, and chili powder to the skillet. Cook the mixture for about 5 minutes, stirring occasionally. Season with salt and pepper to taste.

Combine the cooked quinoa with the bean and corn mixture in the skillet. Mix well to ensure all ingredients are evenly distributed. Spoon the filling into each bell pepper, packing it down gently. Top each stuffed pepper with a generous amount of shredded cheese.

Transfer the stuffed peppers to the oven and bake for 25-30 minutes, or until the peppers are tender and the cheese is melted and bubbly. Remove from the oven and let them cool for a few minutes. Garnish with fresh cilantro and serve with lime wedges on the side for an extra burst of flavor.

Nutrition Facts

This recipe makes 4 servings, with each serving containing approximately 350 calories. This makes it a healthy and satisfying meal option that won’t derail your diet.

Preparation Time

The total preparation time for this recipe is about 50 minutes. This includes the time needed to cook the quinoa, prepare the filling, and bake the stuffed peppers. It’s a relatively quick meal that doesn’t require hours in the kitchen, making it perfect for busy weeknights.

How to Serve

  • Serve the stuffed peppers warm, straight from the oven.
  • Pair them with a fresh green salad for a balanced meal.
  • Top with a dollop of sour cream or Greek yogurt for added creaminess.
  • Enjoy with a side of crusty bread to soak up any leftover juices.
  • For a complete vegetarian feast, serve alongside a hearty soup.

Additional Tips

  • Choose firm and fresh peppers: Select peppers that are firm and have a vibrant color for the best results.
  • Adjust spices to taste: Feel free to tweak the amount of cumin and chili powder to match your flavor preferences.
  • Make it vegan: To make this dish vegan, simply omit the cheese or use a plant-based cheese alternative.
  • Prepare in advance: The filling can be made a day ahead and stored in the fridge, making it easier to assemble the peppers when you’re ready to bake.
  • Experiment with fillings: Try adding other ingredients such as diced tomatoes, mushrooms, or zucchini for a different twist.

FAQ Section

Q: Can I freeze stuffed bell peppers?

A: Yes, you can freeze them! Allow the stuffed peppers to cool completely, then wrap each pepper individually in plastic wrap and place them in a freezer-safe container. They can be stored in the freezer for up to 3 months. To reheat, thaw them overnight in the refrigerator and bake in the oven until heated through.

Q: Can I use a different grain instead of quinoa?

A: Absolutely! You can substitute quinoa with other grains like rice, bulgur, or couscous. Keep in mind that cooking times may vary depending on the grain used.

Q: Are stuffed bell peppers gluten-free?

A: As long as you use gluten-free ingredients (like quinoa and gluten-free vegetable broth), this recipe is naturally gluten-free. Always check labels to ensure all products are certified gluten-free.

Q: How can I make this dish spicier?

A: To add more heat, you can include diced jalapeños or red pepper flakes in the filling. Adjust the amount to suit your spice tolerance.

Q: What can I do with leftover filling?

A: Leftover filling can be repurposed in many ways! Use it as a filling for burritos or tacos, or serve it over a bed of greens for a hearty salad.

Crispy Zucchini Chips

When it comes to snack time, finding a healthy yet satisfying option can sometimes feel like an impossible task. In our household, we are always on the lookout for recipes that not only taste great but also offer nutritional benefits. Enter crispy zucchini chips—a recipe that has quickly become a beloved staple in our snack rotation. These chips are not just a delightful way to sneak in some veggies; they are also incredibly easy to make. The first time we tried them, the whole family was hooked. The crispy texture combined with the subtle flavor of zucchini, elevated by a touch of seasoning, made these chips disappear almost as quickly as they were made.

Ingredients

The beauty of this recipe lies in its simplicity, requiring only a handful of ingredients that are likely already in your pantry. To make these delicious zucchini chips, you’ll need the following:

  • 2 medium zucchinis
  • 2 tablespoons olive oil
  • 1/2 cup grated Parmesan cheese
  • 1/2 teaspoon garlic powder
  • 1/2 teaspoon onion powder
  • Salt and pepper to taste

This straightforward ingredient list keeps the focus on the fresh taste of the zucchini while the Parmesan and seasonings provide a flavorful punch that elevates the humble vegetable to new heights.

Instructions

Creating these zucchini chips is a breeze, making them an ideal snack for busy weeknights or impromptu gatherings. Follow these simple steps:

  1. Preheat your oven to 425°F (220°C) and line a baking sheet with parchment paper.
  2. Slice the zucchinis thinly, aiming for uniform slices to ensure even cooking. A mandoline slicer can be particularly useful here.
  3. In a large bowl, toss the zucchini slices with olive oil, ensuring each piece is evenly coated.
  4. In a separate small bowl, mix together the Parmesan cheese, garlic powder, onion powder, salt, and pepper.
  5. Sprinkle the cheese mixture over the zucchini slices, tossing gently to coat.
  6. Arrange the zucchini slices in a single layer on the prepared baking sheet.
  7. Bake in the preheated oven for 20-25 minutes, or until the chips are golden brown and crispy.
  8. Allow the chips to cool slightly on the baking sheet before serving.

This method ensures maximum crispiness, making these chips a delightful crunchy treat.

Nutrition Facts

Understanding the nutritional value of what we eat is important, especially for those monitoring their calorie intake. This recipe yields approximately four servings, with each serving containing about 150 calories. These zucchini chips are not only a low-calorie snack option but are also packed with vitamins and minerals, making them a guilt-free indulgence.

Preparation Time

One of the standout features of this recipe is its efficiency. From start to finish, you can have a batch of crispy zucchini chips ready in just under 40 minutes. This includes about 10 minutes of prep time to slice the zucchini and mix the seasonings, followed by 25 minutes of baking. The result is a quick and easy snack that fits seamlessly into even the busiest of schedules.

How to Serve

These zucchini chips are versatile and can be enjoyed in a variety of ways. Here are some serving suggestions:

  • Serve them as a standalone snack, perfect for curbing afternoon cravings.
  • Pair them with your favorite dip, such as hummus or a spicy aioli, for added flavor.
  • Use them as a crunchy topping for salads or soups to add texture.
  • Include them as part of a charcuterie board for a balanced mix of flavors.
  • Offer them as a healthier alternative to traditional chips during parties or gatherings.

These serving ideas showcase the versatility of zucchini chips, making them a great addition to any meal or occasion.

Additional Tips

For the best results with your zucchini chips, consider the following tips:

  1. Uniform Slices: Aim for even slices to ensure consistent cooking and prevent some chips from burning while others remain undercooked.
  2. Dry Zucchini: Pat the zucchini slices dry with a paper towel before baking to remove excess moisture and achieve maximum crispiness.
  3. Cheese Substitutes: Feel free to experiment with different cheeses, such as Pecorino Romano, for a unique flavor twist.
  4. Storage: Store any leftover chips in an airtight container at room temperature to maintain their crispness.
  5. Spice It Up: Add a pinch of cayenne pepper or smoked paprika to the seasoning mix for an extra kick.

These tips will help ensure your zucchini chips turn out perfectly every time.

FAQ Section

Here are some frequently asked questions about making crispy zucchini chips:

Q: Can I use other vegetables for this recipe?
A: Absolutely! While zucchini is a popular choice, you can experiment with other vegetables such as sweet potatoes, carrots, or beets for a different flavor profile.

Q: How can I ensure my zucchini chips are crispy?
A: The key to crispy chips is removing excess moisture from the zucchini slices before baking and ensuring they are spread out in a single layer on the baking sheet.

Q: Can I make these chips in an air fryer?
A: Yes, an air fryer is a great option for making zucchini chips. Set the air fryer to 400°F (200°C) and cook for approximately 10-15 minutes, checking for crispiness.

Q: Are these chips suitable for a low-carb diet?
A: Yes, zucchini chips are a low-carb snack option, making them suitable for those following a low-carb or keto diet.

Q: Can I freeze zucchini chips?
A: Freezing is not recommended as it can affect the texture and crispiness of the chips. Instead, enjoy them fresh or store them in an airtight container for a few days.

With these answers in mind, you’re well-equipped to tackle any challenges that may arise when making your own batch of crispy zucchini chips.

Mini Caprese Skewers

There’s something uniquely delightful about the simplicity and elegance of Mini Caprese Skewers. A personal favorite in our household, these bite-sized appetizers are not only visually appealing but also burst with flavors that can captivate any palate. The first time I made these skewers, I was hosting a small family gathering. The vibrant colors and fresh ingredients were such a hit that even the most skeptical of my relatives couldn’t resist going back for seconds. The classic combination of fresh mozzarella, ripe cherry tomatoes, and fragrant basil leaves drizzled with balsamic glaze is a testament to the magic that happens when fresh, quality ingredients come together. These skewers have since become a staple at our family events, celebrated not only for their taste but also for their ease of preparation, making them perfect for hosts who want to impress without spending hours in the kitchen.

Ingredients

Creating these delightful skewers requires only a handful of ingredients, making them not only easy to prepare but also a budget-friendly option for any event. The key is to select the freshest produce and the highest quality ingredients to ensure the best flavor. Here’s what you’ll need:

  • Fresh Mozzarella Balls: Opt for the cherry-sized mozzarella balls, also known as bocconcini, for the perfect bite-sized piece.
  • Cherry Tomatoes: Choose ripe, firm cherry tomatoes for a sweet and juicy contrast to the creamy mozzarella.
  • Fresh Basil Leaves: Look for vibrant, green leaves without any blemishes or wilting to add a fragrant freshness to the skewers.
  • Balsamic Glaze: A drizzle of balsamic glaze adds a tangy sweetness that complements the other ingredients beautifully.
  • Olive Oil: A light coating of high-quality olive oil enhances the natural flavors of the mozzarella and tomatoes.
  • Salt and Pepper: To taste, these seasonings bring out the best in each ingredient, adding depth and balance to the skewers.
  • Wooden Skewers: Choose small, sturdy skewers or toothpicks to hold the ingredients securely.

Instructions

Assembling Mini Caprese Skewers is straightforward and can be done in advance, allowing you to focus on other aspects of your event. Here’s a step-by-step guide to creating these delicious morsels:

  1. Prepare the Ingredients: Start by washing the cherry tomatoes and basil leaves thoroughly. Pat them dry with a paper towel to remove any excess moisture.
  2. Assemble the Skewers: Take a wooden skewer and thread a cherry tomato onto it, followed by a fresh basil leaf and a mozzarella ball. Repeat this sequence until the skewer is filled, leaving some space at the top for easy handling.
  3. Season the Skewers: Once all skewers are assembled, place them on a serving platter. Lightly drizzle with olive oil and season with salt and pepper to taste.
  4. Add the Finishing Touch: Just before serving, drizzle the skewers with balsamic glaze. This step is best done right before serving to prevent the glaze from making the basil leaves soggy.
  5. Serve and Enjoy: These skewers can be served immediately or stored in the refrigerator for a few hours before your event. If storing, cover them loosely with plastic wrap to maintain freshness.

Nutrition Facts

Understanding the nutritional value of each serving can be helpful, especially for those mindful of their dietary intake. Each serving of Mini Caprese Skewers, generally consisting of about three skewers, offers a balanced and nutritious option for your guests:

  • Servings: This recipe yields approximately 10 servings, depending on the size of the mozzarella balls and tomatoes used.
  • Calories per Serving: Each serving contains approximately 150 calories, making these skewers a light and healthy choice for any gathering.

Preparation Time

One of the many advantages of this recipe is its minimal preparation time, allowing you to focus on other tasks or simply relax before your guests arrive. On average, assembling a batch of Mini Caprese Skewers takes about 20 to 30 minutes. This efficiency makes them an ideal choice for both planned events and last-minute gatherings. The key to quick assembly is to prepare all ingredients in advance and create an assembly line for threading the skewers, ensuring a smooth and hassle-free process.

How to Serve

Mini Caprese Skewers are versatile and can be served in various ways to suit the theme and style of your event:

  • Arrange them on a platter with a small bowl of extra balsamic glaze for dipping.
  • Incorporate them into a charcuterie board alongside cured meats and assorted cheeses for a more substantial appetizer spread.
  • Serve them as a refreshing side dish at a barbecue or picnic, where their cool, fresh flavors provide a delightful contrast to grilled foods.
  • Pair them with a crisp white wine or a light, fruity rosé to enhance their flavors and complement your beverage selection.
  • For a more formal setting, place each skewer in a shot glass with a small amount of balsamic glaze at the bottom for an elegant presentation.

Additional Tips

To ensure your Mini Caprese Skewers are a hit, consider these additional tips:

  1. Select Quality Ingredients: The flavors in this dish are simple and rely heavily on the quality of the ingredients, so choose the best you can find.
  2. Keep it Fresh: Assemble the skewers as close to serving time as possible to maintain the freshness of the basil and the integrity of the mozzarella.
  3. Experiment with Variations: Try adding a small piece of prosciutto or a slice of avocado to each skewer for an interesting twist.
  4. Use Homemade Balsamic Glaze: For a richer flavor, consider making your own balsamic glaze by reducing balsamic vinegar with a bit of sugar until syrupy.
  5. Chill Before Serving: If preparing in advance, allow the skewers to chill in the refrigerator for a refreshing bite that’s perfect for warm-weather events.

FAQ Section

Here are some frequently asked questions about Mini Caprese Skewers:

  1. Can I prepare these skewers in advance? Yes, you can prepare them a few hours ahead of time. Just be sure to add the balsamic glaze right before serving to keep the basil fresh.
  2. What can I use as a substitute for mozzarella balls? If mozzarella balls are not available, you can use cubed fresh mozzarella or even bocconcini.
  3. How should I store leftover skewers? Store any leftovers in an airtight container in the refrigerator. They are best consumed within 24 hours.
  4. Can I make these skewers gluten-free? These skewers are naturally gluten-free as long as the balsamic glaze and any additional ingredients are checked for gluten content.
  5. What other herbs can I use besides basil? While basil is traditional, you can experiment with other herbs like mint or arugula for a different flavor profile.

Roasted Garlic Hummus

There’s something truly magical about the aroma of roasted garlic wafting through the kitchen. This warm, inviting scent promises a depth of flavor that’s both comforting and captivating. When incorporated into a classic dish like hummus, roasted garlic elevates the humble dip to gourmet status. Recently, I decided to try a roasted garlic hummus recipe, and it was a hit with my family. The creamy texture, combined with the rich, nutty flavor of roasted garlic, made it an instant favorite at our dinner table. Even my kids, who are usually quite picky, couldn’t resist going back for seconds.

Ingredients

Creating a delicious roasted garlic hummus starts with the right ingredients. Here’s what you’ll need to make a batch that serves about six people:

  • 1 head of garlic
  • 1 tablespoon olive oil
  • 1 can (15 ounces) chickpeas, drained and rinsed
  • 1/4 cup tahini
  • Juice of 1 lemon
  • 1 teaspoon ground cumin
  • 1/2 teaspoon salt
  • 1/4 teaspoon freshly ground black pepper
  • 2 to 4 tablespoons water, as needed
  • Additional olive oil for drizzling
  • Chopped fresh parsley for garnish (optional)

Instructions

Making roasted garlic hummus is a straightforward process, but it does require a bit of patience as you roast the garlic to perfection:

  1. Preheat your oven to 400°F (200°C). Cut the top off the head of garlic, just enough to expose the tops of the cloves.
  2. Place the garlic on a piece of aluminum foil and drizzle with 1 tablespoon of olive oil. Wrap the foil around the garlic and roast in the oven for 30 to 40 minutes, or until the cloves are soft and golden brown. Let it cool slightly.
  3. Once the garlic is cool enough to handle, squeeze the cloves out of their skins into a food processor.
  4. Add the chickpeas, tahini, lemon juice, cumin, salt, and pepper to the food processor.
  5. Blend the mixture until smooth. You may need to stop and scrape down the sides of the bowl occasionally.
  6. Add water, one tablespoon at a time, until you reach your desired consistency.
  7. Taste and adjust the seasoning if necessary.
  8. Transfer the hummus to a serving bowl, drizzle with olive oil, and garnish with chopped parsley if desired.

Nutrition Facts

When enjoying roasted garlic hummus, it’s helpful to know the nutritional information, especially if you’re keeping an eye on your intake:

  • Servings: 6
  • Calories per serving: Approximately 150 calories

Preparation Time

You’ll find that this roasted garlic hummus is relatively quick to prepare, especially if you multitask:

  • Roasting garlic: 30-40 minutes
  • Preparing hummus: 10 minutes
  • Total time: 40-50 minutes

How to Serve

Roasted garlic hummus is versatile and can be served in a variety of ways:

  • As a dip with pita bread, crackers, or fresh vegetables like carrot sticks, cucumber slices, and bell pepper strips.
  • Spread on sandwiches or wraps for an extra burst of flavor.
  • As a topping for grilled meats or vegetables.
  • In a Mediterranean-inspired bowl with quinoa, roasted vegetables, and olives.
  • As a side dish at a barbecue or picnic.

Additional Tips

To make the most out of your roasted garlic hummus, keep these tips in mind:

  1. Use fresh ingredients: The fresher your ingredients, the better your hummus will taste. Try to use fresh lemon juice and high-quality tahini.
  2. Adjust to taste: Hummus is very forgiving. Feel free to adjust the amount of lemon juice, salt, and cumin to match your personal preferences.
  3. Make it ahead: Roasted garlic hummus can be stored in the refrigerator for up to a week. Making it ahead of time can enhance the flavors.
  4. Experiment with flavors: Don’t be afraid to add other ingredients like roasted red peppers or sun-dried tomatoes for a different twist.
  5. Serve at room temperature: For the best flavor, let your hummus sit at room temperature for about 30 minutes before serving.

FAQ Section

Here are some frequently asked questions about roasted garlic hummus:

  1. Can I use canned garlic instead of fresh roasted garlic? While it’s possible, fresh roasted garlic provides a deeper, richer flavor that is hard to replicate with canned garlic.
  2. Is there a substitute for tahini? If you don’t have tahini, you can use peanut butter or sunflower seed butter as an alternative, but it will change the flavor profile.
  3. How do I store leftover hummus? Store leftover hummus in an airtight container in the refrigerator for up to a week.
  4. Can I freeze roasted garlic hummus? Yes, you can freeze it for up to three months. Just thaw it in the refrigerator and stir well before serving.
  5. What if my hummus is too thick? If your hummus is too thick, simply add more water or olive oil, a tablespoon at a time, until you reach the desired consistency.