Baba Ganoush with Pita Bread

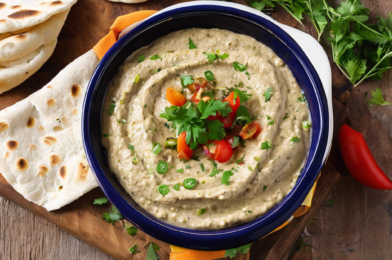
When I first tried this Baba Ganoush recipe, I was blown away by its creamy texture and smoky flavor. I shared it with my family during a casual weekend gathering, and it became an instant hit. The subtle blend of roasted eggplant with tahini, garlic, and lemon juice creates a symphony of flavors that is both exotic and comforting. My children, who are usually picky eaters, couldn’t get enough of it, and my partner requested we make it a weekly staple. It’s a dish that easily brings people together, appealing to both adventurous and traditional palates alike.

Ingredients

The beauty of Baba Ganoush lies in its simplicity and the quality of its ingredients. Here’s what you’ll need:

  • 2 large eggplants
  • 1/4 cup tahini
  • 2 tablespoons freshly squeezed lemon juice
  • 3 cloves garlic, minced
  • 2 tablespoons olive oil, plus more for serving
  • 1 teaspoon salt
  • 1/2 teaspoon ground cumin
  • 1/4 cup chopped fresh parsley
  • Pita bread, for serving

Instructions

Preparing Baba Ganoush is as rewarding as it is straightforward. Follow these steps to create this delightful dish:

  1. Preheat your oven to 400°F (200°C). Prick the eggplants all over with a fork to prevent them from bursting during roasting.
  2. Place the eggplants on a baking sheet and roast them in the preheated oven for about 45 minutes, turning occasionally, until they are soft and the skin is charred.
  3. Once roasted, remove the eggplants from the oven and allow them to cool slightly. Peel off the skin and discard it, then place the flesh in a colander to drain off excess liquid.
  4. Transfer the eggplant flesh to a food processor. Add tahini, lemon juice, minced garlic, olive oil, salt, and cumin. Blend the mixture until smooth and creamy.
  5. Taste and adjust seasoning if necessary. Transfer the Baba Ganoush to a serving bowl, drizzle with additional olive oil, and garnish with chopped parsley.
  6. Serve with warm pita bread and enjoy!

Nutrition Facts

This recipe serves approximately 6 people, with each serving containing around 120 calories. It’s a nutritious option that’s rich in fiber, healthy fats, and essential nutrients. The combination of eggplant and tahini offers a good source of vitamins and minerals, making it a healthy addition to any meal.

Preparation Time

One of the many charms of Baba Ganoush is how relatively quick it is to prepare. From start to finish, you should expect to spend about 1 hour. This includes roasting the eggplants and preparing the other ingredients. The time investment is well worth the delicious result that awaits.

How to Serve

There are numerous ways to enjoy Baba Ganoush, making it a versatile addition to your culinary repertoire. Here are some serving suggestions:

  • Appetizer: Serve Baba Ganoush as an appetizer with warm, soft pita bread or pita chips for dipping.
  • Sandwich Spread: Use it as a flavorful spread in sandwiches or wraps, paired with grilled vegetables or falafel.
  • Salad Dressing: Thin out the Baba Ganoush with a bit of water or extra lemon juice to use as a salad dressing.
  • Grilled Meats: Pair it with grilled meats such as lamb or chicken for a Middle Eastern-inspired meal.
  • Vegetable Platter: Accompany a platter of fresh vegetables like carrots, cucumbers, and bell peppers for a healthy snack.

Additional Tips

To ensure your Baba Ganoush is the best it can be, consider these tips:

  1. Selecting Eggplants: Choose firm, glossy eggplants with no blemishes. The fresher they are, the better the flavor.
  2. Roasting Alternatives: If you prefer a smokier flavor, consider grilling the eggplants instead of roasting them in the oven.
  3. Consistency: For a chunkier texture, mash the eggplant by hand instead of using a food processor.
  4. Make Ahead: Baba Ganoush can be made a day in advance and stored in the refrigerator. This allows the flavors to meld together beautifully.
  5. Garnishing: Besides parsley, you can garnish with pomegranate seeds or a sprinkle of smoked paprika for added color and flavor.

FAQ Section

Here are some frequently asked questions to help you perfect your Baba Ganoush:

  1. Can I use store-bought tahini? Yes, store-bought tahini works perfectly. Just ensure it is well-mixed before adding it to your Baba Ganoush.
  2. Is Baba Ganoush vegan? Yes, the traditional recipe is completely vegan, making it a great option for plant-based diets.
  3. How long does Baba Ganoush last? Stored in an airtight container in the refrigerator, Baba Ganoush can last up to 4 days.
  4. Can I freeze Baba Ganoush? While you can freeze it, the texture may change slightly upon thawing. It’s best enjoyed fresh or refrigerated.
  5. What can I do if my Baba Ganoush is too bitter? If it tastes bitter, try adding a bit more lemon juice or a pinch of sugar to balance the flavors.

Spiced Lentil Patties

Spiced Lentil Patties have become a beloved staple in my household, often gracing our dinner table with their aromatic allure and satisfying texture. The first time I made these patties, I was amazed by how quickly they disappeared, with even the pickiest eaters reaching for seconds. The combination of spices and the wholesome goodness of lentils create a dish that’s not only nutritious but also incredibly delicious. My family, who are always up for trying new vegetarian dishes, gave this recipe a resounding thumbs up. The patties are crispy on the outside while maintaining a soft, flavorful interior that keeps everyone coming back for more.

Ingredients

The beauty of Spiced Lentil Patties lies in their simplicity and the use of easily accessible ingredients. Here’s what you’ll need:

  • 1 cup of dried lentils, rinsed and drained
  • 2 cups of water
  • 1 medium onion, finely chopped
  • 2 cloves of garlic, minced
  • 1 tablespoon of ginger, grated
  • 1 teaspoon of cumin powder
  • 1 teaspoon of coriander powder
  • 1/2 teaspoon of turmeric powder
  • 1/2 teaspoon of chili powder (adjust to taste)
  • 1/2 cup of breadcrumbs
  • Salt and pepper to taste
  • 2 tablespoons of oil for frying
  • Fresh cilantro for garnish

Instructions

Creating these flavorful patties is a straightforward process. Follow these steps to achieve perfect Spiced Lentil Patties:

  1. Start by cooking the lentils. In a medium-sized pot, combine the lentils with water. Bring to a boil, then reduce the heat to low and cover the pot. Let the lentils simmer for about 20-25 minutes or until they are tender and have absorbed most of the water.

  2. Drain any excess water from the lentils and transfer them to a large mixing bowl. Use a fork or a potato masher to partially mash the lentils, leaving some whole for texture.

  3. In a frying pan, heat a tablespoon of oil over medium heat. Add the chopped onion, garlic, and ginger. Sauté until the onions are translucent and the mixture is fragrant.

  4. Add the sautéed onion mixture to the lentils. Stir in the cumin, coriander, turmeric, and chili powder. Mix well to ensure the spices are evenly distributed.

  5. Add the breadcrumbs to the lentil mixture, season with salt and pepper, and mix until well combined. The mixture should be firm enough to hold its shape when formed into patties. If necessary, add more breadcrumbs.

  6. Shape the mixture into small patties, about the size of your palm. You should be able to make around 10-12 patties.

  7. In the same frying pan, add another tablespoon of oil and heat over medium heat. Cook the patties in batches, ensuring not to overcrowd the pan. Fry each patty for about 3-4 minutes on each side or until golden brown and crispy.

  8. Once cooked, transfer the patties to a paper towel-lined plate to drain excess oil. Garnish with fresh cilantro before serving.

Nutrition Facts

These Spiced Lentil Patties are not only delectable but also packed with nutrients. Here’s a breakdown of the nutrition facts:

  • Servings: 4 (3 patties each)
  • Calories per serving: approximately 250

Preparation Time

From start to finish, you can expect to spend about 45 minutes making these patties. This includes 10 minutes of prep time and 35 minutes of cooking time. It’s a quick and easy recipe, perfect for a weeknight meal or a weekend gathering.

How to Serve

Spiced Lentil Patties are versatile and can be served in various ways:

  • Serve them as a main dish with a side of green salad and yogurt sauce.
  • Use them as a filling in wraps or sandwiches, paired with fresh vegetables and a dollop of hummus.
  • Top them with avocado slices and a squeeze of lime juice for an added burst of flavor.
  • Pair them with a spicy chutney or salsa for a tantalizing appetizer.
  • Enjoy them as a snack on their own, warm or at room temperature.

Additional Tips

To ensure your Spiced Lentil Patties turn out perfectly every time, consider these additional tips:

  1. Choose the right lentils: Green or brown lentils work best for this recipe as they hold their shape well during cooking.

  2. Adjust the spice level: If you prefer a milder flavor, reduce the amount of chili powder. For an extra kick, add a pinch of cayenne pepper.

  3. Experiment with herbs: Feel free to add different herbs like parsley or mint to customize the flavor to your liking.

  4. Make ahead: Prepare the patties ahead of time and refrigerate them. Cook them just before serving for maximum freshness.

  5. Double the batch: These patties freeze well. Make a double batch and freeze the extras for a quick meal option on busy days.

FAQ Section

Q: Can I use canned lentils instead of dried?

A: Yes, you can use canned lentils to save time. Be sure to rinse and drain them well before using. You may need to adjust the amount of breadcrumbs as canned lentils are softer.

Q: Are these patties gluten-free?

A: To make these patties gluten-free, simply substitute the breadcrumbs with gluten-free breadcrumbs or crushed gluten-free crackers.

Q: Can I bake these patties instead of frying?

A: Absolutely! Preheat your oven to 375°F (190°C) and bake the patties on a lined baking sheet for 25-30 minutes, flipping halfway through.

Q: How do I store leftovers?

A: Store any leftover patties in an airtight container in the refrigerator for up to 3 days. Reheat them in a skillet or the oven before serving.

Q: What can I serve with these patties for a complete meal?

A: For a well-rounded meal, serve the patties with quinoa or brown rice, a green salad, and a yogurt-based sauce or chutney.

With these insights and tips, you are well-equipped to make and enjoy Spiced Lentil Patties. Whether you’re hosting a dinner party or planning a casual family meal, these patties are sure to impress and satisfy. Happy cooking!

Roasted Beetroot Dip

When I first came across the recipe for Roasted Beetroot Dip, I was intrigued by its vibrant color and potential for bold flavors. Eager to try something new, I whipped it up for a family gathering, and it was an instant hit! The earthy sweetness of the roasted beets combined with the creamy texture made it a standout dish. Even those who were initially skeptical about beets couldn’t resist going back for seconds. This recipe has now become a staple in our household, especially for entertaining guests.

Ingredients

To make this delightful Roasted Beetroot Dip, you’ll need the following ingredients:

  • 3 medium-sized beetroots
  • 2 tablespoons of olive oil
  • 1 clove of garlic, minced
  • 1/2 cup of Greek yogurt
  • 2 tablespoons of lemon juice
  • Salt and pepper to taste
  • Fresh dill for garnish (optional)

Instructions

Creating this dip is a straightforward process that maximizes the natural flavors of the beets. Start by preheating your oven to 400°F (200°C). Wash and trim the beetroot, then wrap each one in aluminum foil. Place them on a baking sheet and roast in the preheated oven for about 45 minutes to an hour, or until they are tender when pierced with a fork.

Once the beets are roasted, let them cool slightly before peeling off the skins. This should be easy as the skin will slip off with a little pressure. Chop the roasted beets into smaller pieces and place them in a food processor. Add the minced garlic, Greek yogurt, lemon juice, and olive oil. Blend until smooth, scraping down the sides as necessary.

Season the dip with salt and pepper to taste. If you’d like a bit of extra flavor, feel free to add in some fresh dill. Transfer the dip to a bowl and refrigerate it for at least an hour before serving. This allows the flavors to meld together beautifully.

Nutrition Facts

This recipe yields about 6 servings, with each serving containing approximately 80 calories. It’s a healthy option for those looking to enjoy a nutritious snack or appetizer.

Preparation Time

The total preparation time for this Roasted Beetroot Dip is roughly 1 hour and 30 minutes, including roasting and cooling time. The hands-on time is minimal, making it an easy choice for busy days.

How to Serve

There are several ways to enjoy this delicious dip:

  • As a spread: Use it as a flavorful spread on sandwiches or wraps.
  • With crackers: Serve it with your favorite crackers or pita chips for a delightful appetizer.
  • As a side: Pair it with grilled meats or vegetables for an added burst of flavor.
  • On a platter: Include it as part of an appetizer platter with other dips and crudités.
  • In a salad: Drizzle it over a fresh green salad for a unique dressing.

Additional Tips

To ensure your Roasted Beetroot Dip turns out perfectly, consider the following tips:

  1. Choose fresh beets: Opt for beets that are firm and free from blemishes for the best flavor.
  2. Adjust seasoning: Taste and adjust the seasoning after blending to suit your palate.
  3. Experiment with herbs: Try adding different herbs like parsley or mint for a fresh twist.
  4. Make it ahead: This dip can be made a day in advance, allowing the flavors to develop further.
  5. Store properly: Keep the dip in an airtight container in the refrigerator for up to three days.

FAQ Section

Q: Can I use canned beets instead of fresh ones?

A: While fresh beets provide the best flavor, canned beets can be used in a pinch. Just ensure they are well-drained before blending.

Q: Is there a vegan option for this dip?

A: Yes! Substitute the Greek yogurt with a plant-based alternative like coconut yogurt or silken tofu for a vegan version.

Q: How can I make the dip spicier?

A: Add a pinch of cayenne pepper or a splash of hot sauce to give the dip a spicy kick.

Q: Can I freeze the Roasted Beetroot Dip?

A: Freezing is not recommended as it may affect the texture and flavor of the dip.

Q: What other vegetables pair well with this dip?

A: Carrot sticks, celery, cucumber slices, and bell pepper strips are all excellent choices to serve alongside this dip.

Mini Spanakopita Triangles

There’s something undeniably captivating about the crisp, flaky layers of phyllo pastry hugging a savory filling. The first time I made mini spanakopita triangles, they were an absolute hit at a family gathering. My relatives, always eager to try new dishes, were particularly enthusiastic. They praised the delightful balance of flavors and textures, from the crunch of the pastry to the creamy, tangy filling. This recipe quickly became a family favorite, requested at every special occasion. The best part? These little triangles are as fun to make as they are to eat!

Ingredients

To create these delightful mini spanakopita triangles, you’ll need the following ingredients:

  • 1 package of phyllo dough (about 16 sheets), thawed
  • 1 pound fresh spinach, washed and chopped
  • 1 cup feta cheese, crumbled
  • 1/2 cup ricotta cheese
  • 1/4 cup grated Parmesan cheese
  • 1 small onion, finely chopped
  • 2 cloves garlic, minced
  • 2 tablespoons olive oil
  • 1 tablespoon fresh dill, chopped
  • 1 tablespoon fresh parsley, chopped
  • 1/4 teaspoon nutmeg
  • Salt and pepper to taste
  • 1/2 cup unsalted butter, melted (for brushing the phyllo)

Instructions

Begin by preheating your oven to 375°F (190°C). In a large skillet, heat the olive oil over medium heat. Add the chopped onion and garlic, sautéing until they become translucent and fragrant, about 3-4 minutes. Then, stir in the chopped spinach, cooking until it wilts down and releases its moisture. This should take around 5-7 minutes. Once cooked, remove the mixture from heat and let it cool slightly.

In a large mixing bowl, combine the feta, ricotta, and Parmesan cheeses. Add the cooled spinach mixture, dill, parsley, nutmeg, salt, and pepper. Mix until the ingredients are well incorporated.

Next, prepare your workspace for assembling the triangles. Take a sheet of phyllo dough and place it on a clean surface. Brush it lightly with melted butter. Layer another sheet of phyllo on top and brush with butter again. Using a sharp knife or a pizza cutter, divide the phyllo sheets into long strips, about 2 inches wide.

Place a small spoonful of the spinach and cheese mixture at the end of each strip. Fold the phyllo over the filling to form a triangle, similar to folding a flag. Continue folding until you reach the end of the strip, ensuring the filling is sealed within the triangle. Brush the top with more melted butter to help it achieve a golden brown color while baking.

Arrange the triangles on a baking sheet lined with parchment paper. Bake in the preheated oven for about 20-25 minutes or until the pastry is golden and crisp. Serve warm for the best taste experience.

Nutrition Facts

This recipe yields approximately 24 mini spanakopita triangles. Each serving contains around 90 calories, making it a delightful yet relatively low-calorie appetizer or snack option.

Preparation Time

Preparing these mini spanakopita triangles is a relatively quick process, perfect for those who enjoy cooking without spending hours in the kitchen. From start to finish, the entire process, including preparation and baking, takes about 1 hour.

How to Serve

  • Arrange these mini triangles on a large platter for a stunning presentation.
  • Serve alongside a bowl of tzatziki sauce for a refreshing dip.
  • Pair with a simple Greek salad for a light and balanced meal.
  • Include them as part of a larger mezze platter with olives, hummus, and pita bread.
  • Offer them as a vegetarian option at gatherings and parties.

Additional Tips

1. Keep Phyllo Moist: Phyllo dough can dry out quickly, so work with a few sheets at a time and keep the rest covered with a damp towel.

2. Customize the Filling: Feel free to add other ingredients such as sun-dried tomatoes or pine nuts for added flavor and texture.

3. Make Ahead: These can be assembled and frozen before baking. Simply bake from frozen, adding a few extra minutes to the baking time.

4. Cheese Variations: While traditional spanakopita uses feta cheese, you can experiment with goat cheese for a different flavor profile.

5. Perfect Folding: Take your time folding the triangles to ensure the filling is well enclosed, preventing it from leaking out during baking.

FAQ Section

Q: Can I use frozen spinach instead of fresh spinach?

A: Yes, you can use frozen spinach. Just make sure to thaw and squeeze out excess moisture before using it in the filling.

Q: How do I prevent the phyllo dough from cracking?

A: Keep the phyllo dough covered with a damp cloth while working to prevent it from drying out and cracking.

Q: Can I make these in advance?

A: Yes, you can assemble the triangles and refrigerate them for up to a day before baking. Alternatively, freeze them for longer storage.

Q: Is there a substitute for phyllo dough?

A: While phyllo is traditional, you could try using puff pastry as a substitute, although the texture will be different.

Q: What can I do with leftover phyllo dough?

A: Leftover phyllo can be used to make other pastries, such as baklava or savory tarts. Keep it refrigerated and well-covered to maintain its freshness.

Sweet Potato Crostini with Goat Cheese

There’s something truly magical about the combination of sweet potatoes and goat cheese. When I first stumbled upon this Sweet Potato Crostini with Goat Cheese recipe, I knew it was something special. My family, admittedly a mix of picky eaters and adventurous foodies, were all smitten by the delightful mix of flavors and textures. The creamy goat cheese paired with the sweetness of roasted sweet potatoes and the crunch of toasted crostini offers a culinary experience that’s both simple and sophisticated. It quickly became a favorite at our family gatherings, with everyone eagerly anticipating each bite.

Ingredients

The success of any dish starts with the quality of its ingredients. Here’s what you’ll need to whip up this delicious appetizer:

  • 2 medium sweet potatoes, peeled and sliced into 1/4 inch rounds
  • 2 tablespoons olive oil
  • Salt and pepper to taste
  • 1 French baguette, sliced into 1/2 inch pieces
  • 4 ounces goat cheese, softened
  • 2 tablespoons honey
  • Fresh thyme leaves for garnish
  • Balsamic glaze (optional)

Instructions

Creating this dish is a straightforward process that even beginner cooks can master with ease. Follow these steps to make your Sweet Potato Crostini with Goat Cheese:

  1. Preheat your oven to 400°F (200°C). Line a baking sheet with parchment paper.
  2. In a bowl, toss the sweet potato slices with olive oil, salt, and pepper until evenly coated. Spread them out in a single layer on the prepared baking sheet.
  3. Bake the sweet potatoes in the preheated oven for about 20-25 minutes or until they are tender and slightly caramelized around the edges. Remove from the oven and set aside.
  4. While the sweet potatoes are baking, arrange the baguette slices on another baking sheet. Drizzle or brush them with a bit of olive oil.
  5. Toast the baguette slices in the oven for about 5-7 minutes, or until they are golden brown and crisp. Remove from the oven and let cool slightly.
  6. Spread a generous amount of goat cheese on each crostini. Top with a slice of roasted sweet potato.
  7. Drizzle each crostini with honey and sprinkle with fresh thyme leaves. If using, add a drizzle of balsamic glaze for an extra touch of flavor.
  8. Serve immediately and enjoy the delightful combination of flavors!

Nutrition Facts

Understanding the nutritional content of your meals is essential for maintaining a balanced diet. Here are the nutrition facts for this recipe:

Servings: 8

Calories per serving: Approximately 180

Preparation Time

Time is a precious commodity, especially when planning meals for gatherings. The Sweet Potato Crostini with Goat Cheese is an appetizer that doesn’t require hours in the kitchen. Here’s a breakdown of the preparation time:

  • Preparation Time: 15 minutes
  • Cooking Time: 30 minutes
  • Total Time: 45 minutes

How to Serve

Presentation is key to making any dish appealing. Here are some suggestions on how to serve these crostini to impress your guests:

  • Arrange the crostini on a large platter or wooden board for an elegant presentation.
  • Garnish with additional fresh thyme or microgreens for a pop of color.
  • Include small bowls of extra honey and balsamic glaze for guests to add according to their preference.
  • Pair with a light white wine or sparkling water to complement the flavors.
  • Serve as part of a larger spread, including cheeses, charcuterie, and fresh fruits.

Additional Tips

To ensure your Sweet Potato Crostini with Goat Cheese comes out perfectly every time, consider these helpful tips:

  1. Choose Quality Ingredients: Opt for fresh, high-quality goat cheese and ripe sweet potatoes for the best taste.
  2. Adjust Seasoning: Don’t be afraid to adjust the amount of salt and pepper to suit your taste preferences.
  3. Experiment with Toppings: Consider adding crushed nuts, such as pecans or walnuts, for added texture.
  4. Make Ahead: You can roast the sweet potatoes ahead of time and assemble the crostini just before serving to save time.
  5. Storage: If you have leftovers, store them in an airtight container in the fridge and reheat gently before serving.

FAQ Section

Here are some frequently asked questions about Sweet Potato Crostini with Goat Cheese:

  1. Can I use a different type of cheese? Yes, you can substitute goat cheese with feta or cream cheese if you prefer a different flavor.
  2. Can I make this dish vegan? Absolutely! Use a vegan cheese alternative and agave syrup instead of honey to make it vegan-friendly.
  3. How can I store leftovers? Store any leftovers in an airtight container in the refrigerator for up to two days. Reheat in the oven to restore their crispiness.
  4. What can I serve alongside these crostini? These crostini pair well with a fresh green salad, a bowl of soup, or as part of a charcuterie board.
  5. Can I prepare the crostini in advance? You can prepare the components in advance, but it’s best to assemble them just before serving to ensure they remain crisp and fresh.

Cucumber Avocado Dip

There’s something undeniably refreshing about a well-made dip, and when it comes to healthy and delightful, the cucumber avocado dip stands tall in the world of appetizers. Recently, I decided to try this recipe out for a family gathering, and let me tell you, it was an absolute hit. The creamy texture of the avocado combined with the crispness of the cucumber creates a wonderful balance, making it an ideal companion for chips, crackers, or even fresh veggies. My family couldn’t get enough of it! It’s the kind of recipe that makes you feel good about what you’re eating, knowing it’s packed with wholesome ingredients.

Ingredients

Creating this delicious cucumber avocado dip requires a few simple ingredients that are likely already sitting in your kitchen. Here’s what you will need:

  • 2 medium ripe avocados – Make sure they are perfectly ripe for that creamy texture.
  • 1 medium cucumber – Peeled, seeded, and finely diced.
  • 1 lime – You’ll need both the zest and juice for a zesty kick.
  • 1 small red onion – Finely chopped for an added crunch.
  • 1-2 cloves of garlic – Minced to enhance the flavor.
  • 2 tablespoons fresh cilantro – Chopped, for that fresh taste.
  • Salt and pepper – To taste.
  • Optional: A pinch of red pepper flakes for a bit of heat.

Instructions

Making the cucumber avocado dip is as easy as 1-2-3. Follow these steps to whip up this delightful appetizer:

  1. Prep the Ingredients: Begin by preparing all your ingredients. Halve the avocados, remove the pits, and scoop the flesh into a mixing bowl. Dice the cucumber after peeling and seeding it, chop the red onion finely, and mince the garlic. Set these aside.
  2. Mash the Avocados: Using a fork or potato masher, mash the avocados in the bowl until you reach your desired consistency. Some prefer it smooth, while others enjoy a chunkier texture.
  3. Mix the Ingredients: Add the diced cucumber, chopped red onion, minced garlic, lime zest, and juice into the bowl with the mashed avocados. Stir until everything is well combined.
  4. Season the Dip: Sprinkle in salt, pepper, and red pepper flakes if using. Mix again, and taste to adjust the seasoning if necessary.
  5. Finish with Cilantro: Lastly, fold in the chopped cilantro, ensuring it’s evenly distributed throughout the dip.
  6. Chill and Serve: For the best flavors, chill the dip in the refrigerator for at least 30 minutes before serving. This allows all the flavors to meld together beautifully.

Nutrition Facts

With this recipe, you can expect to get approximately 4 servings, with each serving containing about 150 calories. The dip is not only flavorful but also offers a good dose of healthy fats and fiber, making it a nutritious choice for your snack or appetizer spread.

Preparation Time

One of the best things about this cucumber avocado dip is how quick and easy it is to prepare. From start to finish, you’ll need about 15 minutes of prep time plus an additional 30 minutes to chill in the refrigerator. This makes it a perfect last-minute appetizer or a quick addition to any meal.

How to Serve

Wondering how to present and enjoy your cucumber avocado dip? Here are a few serving suggestions:

  • With Tortilla Chips: A classic combination, the salty crunch of tortilla chips pairs perfectly with the creamy dip.
  • Alongside Fresh Veggies: Carrot sticks, bell pepper slices, and celery make for healthy, colorful dippers.
  • As a Sandwich Spread: Use this dip as a spread for your sandwiches or wraps to add a layer of flavor.
  • With Pita Bread: Warm, soft pita bread is another great option to scoop up the delicious dip.
  • On Top of Grilled Chicken: Add a dollop on grilled chicken breasts for an extra flavor boost.

Additional Tips

To ensure your cucumber avocado dip turns out perfect every time, keep these tips in mind:

  1. Choose Ripe Avocados: The ripeness of the avocados is crucial. They should yield slightly to pressure when squeezed gently.
  2. Prevent Browning: To keep the dip looking fresh, make sure to cover it tightly with plastic wrap, pressing it directly onto the surface of the dip to minimize air exposure.
  3. Adjust Seasonings: Taste the dip before serving and adjust salt, lime juice, and pepper to suit your preference.
  4. Experiment with Herbs: Feel free to substitute cilantro with parsley or dill if you’re not a fan of cilantro.
  5. Make it Spicy: If you enjoy a bit of heat, don’t hesitate to add more red pepper flakes or a dash of hot sauce.

FAQ Section

Here are some frequently asked questions about the cucumber avocado dip:

  1. Can I make this dip ahead of time? Yes, you can prepare this dip a day in advance. Just be sure to store it in an airtight container in the refrigerator to keep it fresh.
  2. What can I use instead of lime juice? If lime juice isn’t available, lemon juice can be a great substitute, providing a similar tangy flavor.
  3. How long does the dip last? Stored properly in the refrigerator, the dip should last up to 2 days. However, it is best consumed fresh.
  4. Can I freeze the dip? Freezing is not recommended as the texture of avocados changes once thawed, which can affect the dip’s consistency.
  5. Is this dip vegan? Absolutely! All ingredients used in this dip are plant-based, making it suitable for vegan diets.

Cauliflower Nachos with Guac

Cooking and sharing meals with loved ones has always been a cherished activity in our household. Recently, I stumbled upon a recipe for Cauliflower Nachos with Guac, and it instantly piqued my interest. Being a fan of both traditional nachos and healthier alternatives, I decided to give this dish a try. The results? Simply delightful. The cauliflower provided a hearty, satisfying base that perfectly complemented the creamy guacamole and tangy toppings. My family was initially skeptical about a nacho dish without the usual tortilla chips, but one bite was all it took to win them over. The vibrant flavors and textures created a deliciously unique experience that has now become a frequent request at our dinner table.

Ingredients

To make Cauliflower Nachos with Guac, you’ll need the following ingredients:

  • 1 head of cauliflower, cut into florets
  • 1 tablespoon olive oil
  • 1 teaspoon chili powder
  • 1 teaspoon garlic powder
  • 1 teaspoon paprika
  • Salt and pepper to taste
  • 1 cup shredded cheddar cheese
  • 1/2 cup black beans, drained and rinsed
  • 1/4 cup sliced jalapeños
  • 1/4 cup diced tomatoes
  • 1/4 cup sliced black olives
  • 1 avocado
  • Juice of 1 lime
  • 2 tablespoons chopped cilantro

Instructions

To prepare this delectable dish, follow these steps:

  1. Preheat your oven to 425°F (220°C). Line a baking sheet with parchment paper.
  2. In a large bowl, combine cauliflower florets, olive oil, chili powder, garlic powder, paprika, salt, and pepper. Toss until the cauliflower is evenly coated.
  3. Spread the cauliflower on the prepared baking sheet in a single layer. Roast in the oven for 20-25 minutes, or until golden and tender.
  4. While the cauliflower is roasting, prepare the guacamole. In a small bowl, mash the avocado with lime juice and cilantro. Season with salt and pepper to taste.
  5. Once the cauliflower is roasted, remove it from the oven and top with cheddar cheese, black beans, jalapeños, tomatoes, and olives.
  6. Return the baking sheet to the oven and bake for an additional 5 minutes, or until the cheese is melted and bubbly.
  7. Remove from the oven and allow to cool slightly before serving with the prepared guacamole.

Nutrition Facts

This recipe serves 4 people, with each serving containing approximately 300 calories. It’s a guilt-free indulgence, packed with nutrients from the vegetables and beans, making it a perfect balance of taste and health.

Preparation Time

The total preparation time for Cauliflower Nachos with Guac is about 35 minutes. This includes 10 minutes of prep time and 25 minutes of cooking time, making it a quick and easy option for a busy weeknight.

How to Serve

  • As an appetizer: Serve as a finger-food starter at your next gathering.
  • As a main dish: Enjoy as a satisfying meal on its own, perhaps with a side salad.
  • For a party: Present on a large platter for guests to help themselves.
  • With a dip: Pair with additional dips like salsa or sour cream.
  • As a topping: Use as a topping for tacos or burritos to add an extra layer of flavor.

Additional Tips

Here are some tips to enhance your Cauliflower Nachos experience:

  1. Customize your toppings: Feel free to add or swap ingredients like corn, bell peppers, or different cheeses to suit your taste.
  2. Make it spicy: Add extra jalapeños or a dash of hot sauce for a spicier kick.
  3. Go vegan: Use vegan cheese and omit any non-vegan toppings for a plant-based version.
  4. Prep ahead: Roast the cauliflower in advance and store it in the fridge. When ready to eat, simply reheat and add the toppings.
  5. Double the batch: If serving a crowd, double the ingredients to ensure everyone gets a taste.

FAQ Section

Q: Can I use frozen cauliflower?

A: Yes, you can use frozen cauliflower, but make sure to thaw and pat it dry to remove excess moisture before roasting.

Q: What can I use instead of cheddar cheese?

A: You can substitute with any cheese you prefer, such as Monterey Jack, mozzarella, or a dairy-free alternative for a vegan version.

Q: How do I store leftovers?

A: Store leftovers in an airtight container in the refrigerator for up to 2 days. Reheat in the oven to regain some crispness.

Q: Can I add meat to this dish?

A: Absolutely! Cooked ground beef, chicken, or even shredded pork can be added for extra protein.

Q: What other dips pair well with these nachos?

A: In addition to guacamole, consider serving with salsa, sour cream, or a creamy queso dip for added variety.

Cauliflower Nachos with Guac offers a fresh, flavorful twist on a classic dish that delights both the palate and the eyes. Enjoy crafting this culinary creation in your kitchen, and watch as it becomes a new favorite among your family and friends!

Tomato Basil Bruschetta

Tomato Basil Bruschetta is a dish that has always held a special place in my heart. The first time I made this recipe, it was for a family gathering on a warm summer evening. The vibrant colors and fresh aroma instantly became a crowd favorite, transcending the simple ingredients into something truly memorable. My family, known for their discerning palates, couldn’t get enough of it. They loved the way the juicy tomatoes paired with the aromatic basil and the perfect crunch of the toasted bread. It was a hit, and since then, it’s been a staple in our family meals. This recipe not only brings people together but also elevates the dining experience, making any occasion feel special.

Ingredients

The key to a delicious Tomato Basil Bruschetta lies in the freshness and quality of its ingredients. Here’s a list of what you’ll need:

  • 4 ripe Roma tomatoes, diced
  • 1/4 cup fresh basil leaves, chopped
  • 3 cloves of garlic, minced
  • 1 tablespoon balsamic vinegar
  • 3 tablespoons extra-virgin olive oil
  • Salt and freshly ground black pepper, to taste
  • 1 French baguette, sliced into 1/2 inch slices
  • 1/4 cup grated Parmesan cheese (optional)

Instructions

Making Tomato Basil Bruschetta is as easy as it is rewarding. Follow these steps to create a delightful appetizer that will impress your guests:

  1. Prepare the Tomato Mixture: In a medium bowl, combine the diced tomatoes, chopped basil, minced garlic, balsamic vinegar, and olive oil. Season with salt and pepper to taste. Mix well and let it sit for at least 15 minutes. This allows the flavors to meld together beautifully.
  2. Toast the Bread: Preheat your oven to 400°F (200°C). Arrange the baguette slices on a baking sheet. Brush each slice lightly with olive oil. Bake in the preheated oven for about 5-7 minutes, or until the edges are golden brown.
  3. Assemble the Bruschetta: Once the bread is toasted, remove it from the oven. Carefully spoon the tomato mixture onto each slice. If desired, sprinkle grated Parmesan cheese over the top for an extra layer of flavor.
  4. Final Touch: Serve immediately while the bread is still warm and the topping is fresh. Enjoy the explosion of flavors with each bite.

Nutrition Facts

This recipe makes approximately 8 servings. Each serving contains around 120 calories, making it a healthy yet indulgent choice for an appetizer or snack.

Preparation Time

The total preparation time for Tomato Basil Bruschetta is approximately 25 minutes. This includes the time needed to chop the ingredients and toast the bread, ensuring you have a quick yet delicious dish ready in no time.

How to Serve

Tomato Basil Bruschetta can be served in a variety of ways, enhancing any meal or occasion. Here are some serving suggestions:

  • As an appetizer at a dinner party, paired with a crisp white wine.
  • As a light lunch, accompanied by a fresh garden salad.
  • As a delightful snack during a casual family gathering.
  • As part of a picnic spread, adding a touch of gourmet flair.
  • As a side dish to complement grilled meats or seafood.

Additional Tips

To ensure your Tomato Basil Bruschetta is as delicious as possible, consider these additional tips:

  1. Choose the Right Tomatoes: Opt for Roma or plum tomatoes, which are less watery and hold their shape better in the mixture.
  2. Use Fresh Garlic: Fresh garlic adds a much more vibrant flavor than pre-minced or powdered varieties.
  3. Experiment with Bread: While a French baguette is traditional, you can also use ciabatta or sourdough for a different texture.
  4. Chill the Tomato Mixture: For a refreshing twist, chill the tomato mixture in the fridge for an hour before serving.
  5. Make Ahead: Prepare the tomato mixture ahead of time and store it in the fridge. Toast the bread just before serving for the best results.

FAQ Section

Q1: Can I make Tomato Basil Bruschetta ahead of time?

A1: Yes, you can prepare the tomato mixture a few hours in advance and store it in the refrigerator. However, it’s best to toast the bread and assemble the bruschetta just before serving to keep the bread crisp.

Q2: What can I use instead of balsamic vinegar?

A2: If you don’t have balsamic vinegar, you can use red wine vinegar or a splash of lemon juice as an alternative. Each will give a slightly different flavor but will still be delicious.

Q3: Is there a way to make this recipe gluten-free?

A3: Absolutely! Simply substitute the French baguette with your favorite gluten-free bread or baguette to make this recipe suitable for gluten-free diets.

Q4: How long can I store leftover bruschetta?

A4: If you have any leftovers, store the tomato mixture in an airtight container in the refrigerator for up to two days. Keep the bread separate to prevent it from becoming soggy.

Q5: Can I add other ingredients to the tomato mixture?

A5: Certainly! Feel free to add ingredients like diced mozzarella, olives, or avocado to the tomato mixture for added texture and flavor. Just make sure to adjust the seasoning accordingly.

Cheesy Spinach Puffs

There’s something incredibly comforting about the aroma of freshly baked pastries wafting through the house. Recently, I decided to try my hand at making Cheesy Spinach Puffs, and let me tell you, they were a hit! Not only did my family devour them in minutes, but they also asked for seconds and thirds. There’s something about the combination of creamy cheese and fresh spinach encased in a flaky pastry that makes these puffs irresistible. Whether you’re serving them as an appetizer, a snack, or even a light meal, Cheesy Spinach Puffs are bound to be a crowd-pleaser.

Ingredients

To create these delightful puffs, you’ll need a few simple ingredients that are likely already in your kitchen. Here’s what you’ll need:

  • 1 package of puff pastry sheets (2 sheets), thawed
  • 1 cup of fresh spinach, chopped
  • 1 cup of ricotta cheese
  • 1/2 cup of feta cheese, crumbled
  • 1/2 cup of grated Parmesan cheese
  • 1 egg, beaten
  • 1 teaspoon of garlic powder
  • Salt and pepper to taste
  • 1 tablespoon of olive oil
  • 1 egg yolk mixed with 1 tablespoon of water (egg wash)

Instructions

Making these Cheesy Spinach Puffs is a straightforward process, perfect for both novice and experienced bakers. Follow these steps to create your own batch:

  1. Preheat your oven: Start by preheating your oven to 400°F (200°C). Line a baking sheet with parchment paper to prevent sticking.
  2. Sauté the spinach: In a skillet, heat the olive oil over medium heat. Add the chopped spinach and sauté until wilted. Remove from heat and let it cool slightly.
  3. Mix the filling: In a large bowl, combine the ricotta, feta, Parmesan, beaten egg, garlic powder, and sautéed spinach. Season with salt and pepper to taste. Mix until well combined.
  4. Prepare the puff pastry: Roll out the thawed puff pastry sheets on a lightly floured surface. Cut each sheet into 9 equal squares.
  5. Fill the pastries: Place a spoonful of the cheese and spinach mixture in the center of each pastry square. Carefully fold the corners of the pastry over the filling, pinching the edges to seal.
  6. Brush with egg wash: Arrange the prepared puffs on the lined baking sheet. Brush the tops with the egg wash to ensure a golden, crispy finish.
  7. Bake: Place the baking sheet in the preheated oven and bake for 15-20 minutes, or until the puffs are golden brown and puffed up.
  8. Cool and serve: Allow the puffs to cool slightly on a wire rack before serving. Enjoy them warm or at room temperature.

Nutrition Facts

These Cheesy Spinach Puffs are not only delicious but also reasonably nutritious. Here’s a breakdown of the nutritional content:

  • Servings: 18 puffs
  • Calories per serving: Approximately 150 calories

Preparation Time

One of the best things about this recipe is how quickly it comes together. Here’s a breakdown of the preparation time:

  • Preparation time: 20 minutes
  • Cooking time: 20 minutes
  • Total time: 40 minutes

How to Serve

Cheesy Spinach Puffs are versatile and can be served in various ways to suit different occasions:

  • As an appetizer at a dinner party, arranged on a platter with a side of marinara sauce for dipping.
  • As a snack during a cozy movie night, paired with a glass of chilled white wine.
  • As part of a brunch buffet, accompanied by fresh fruit and yogurt.
  • As a light lunch, served with a fresh green salad.
  • As a savory addition to a picnic spread.

Additional Tips

To ensure your Cheesy Spinach Puffs turn out perfectly every time, keep these tips in mind:

  1. Thaw the pastry: Make sure your puff pastry is fully thawed before you start working with it to prevent cracking.
  2. Prevent soggy bottoms: Avoid overfilling the pastries, as this can lead to soggy bottoms. A spoonful of filling is enough.
  3. Seal properly: Ensure the edges are well-sealed to prevent the filling from leaking out during baking.
  4. Experiment with cheeses: Feel free to experiment with different types of cheese, such as mozzarella or cheddar, for a unique flavor.
  5. Make ahead: These puffs can be prepared in advance and frozen. Simply bake them from frozen, adding a few extra minutes to the baking time.

FAQ Section

Here are some frequently asked questions about Cheesy Spinach Puffs:

Q: Can I use frozen spinach instead of fresh?

A: Yes, you can use frozen spinach. Make sure to thaw and drain it thoroughly to remove excess moisture before adding it to the filling.

Q: Can I make these puffs vegan?

A: Absolutely! Substitute the cheeses with vegan alternatives and use a plant-based egg replacer. Ensure your puff pastry is vegan as well.

Q: How should I store leftovers?

A: Store any leftover puffs in an airtight container in the refrigerator. They can be reheated in the oven to maintain their crispiness.

Q: Can I add other vegetables to the filling?

A: Certainly! Diced bell peppers, mushrooms, or sun-dried tomatoes would make excellent additions to the filling.

Q: Can I prepare the filling in advance?

A: Yes, the filling can be prepared a day ahead and stored in the refrigerator until you’re ready to assemble the puffs.

These Cheesy Spinach Puffs are a delightful treat that combines the best of both worlds: simplicity and deliciousness. With their flaky crust and creamy filling, they are sure to become a staple in your kitchen repertoire. Whether you’re entertaining guests or simply looking for a comforting snack, these puffs are guaranteed to satisfy. Enjoy baking and sharing these tasty bites with your loved ones!

Spicy Edamame

Spicy Edamame has become a beloved dish in my household, transforming a simple snack into an exciting flavor adventure. When I first introduced this recipe to my family, I was met with a mix of curiosity and skepticism. However, their doubts quickly turned into delight as they savored the spicy, savory flavors that coated each edamame pod. My family now requests this dish regularly, and it has become a staple appetizer for our gatherings. The combination of heat, salt, and umami makes it a satisfying and addictive treat that we can’t get enough of.

Ingredients

The beauty of Spicy Edamame lies in its simplicity and minimal ingredient list. Here’s what you’ll need:

  • 1 pound of edamame in the pod, fresh or frozen
  • 2 tablespoons of soy sauce
  • 1 tablespoon of sesame oil
  • 1 tablespoon of chili paste or sriracha (adjust according to your spice preference)
  • 2 cloves of garlic, minced
  • 1 teaspoon of sea salt
  • 1 teaspoon of toasted sesame seeds for garnish
  • 1/2 teaspoon of red pepper flakes (optional, for extra heat)

Instructions

Follow these steps to prepare a delicious batch of Spicy Edamame:

  1. Start by bringing a large pot of water to a boil. Add a generous pinch of salt to the water.
  2. Add the edamame pods to the boiling water and cook for about 5 minutes or until they are tender yet still firm.
  3. Drain the edamame and set them aside to cool slightly.
  4. In a large skillet, heat the sesame oil over medium heat. Add the minced garlic and sauté until fragrant, about 1 minute.
  5. Stir in the soy sauce, chili paste, and red pepper flakes, if using. Mix well to combine all the flavors.
  6. Add the cooked edamame to the skillet, tossing to coat the pods evenly with the spicy sauce.
  7. Continue to cook for another 2-3 minutes, allowing the flavors to meld together.
  8. Transfer the spicy edamame to a serving dish and sprinkle with toasted sesame seeds.
  9. Serve warm and enjoy the delightful kick of spice!

Nutrition Facts

This recipe makes about 4 servings, with each serving containing approximately 150 calories. The actual calories may vary slightly based on the specific brands of ingredients used. However, this dish remains a relatively low-calorie option packed with protein and fiber, making it a nutritious snack or appetizer choice.

Preparation Time

The preparation time for Spicy Edamame is wonderfully quick, taking only about 10 minutes for prep and an additional 10 minutes for cooking. In total, you can have this tasty snack ready in just 20 minutes, making it perfect for busy weeknights or impromptu gatherings.

How to Serve

Spicy Edamame can be enjoyed in a variety of ways:

  • **As a Snack:** Serve it in a bowl for a quick and healthy snack.
  • **Appetizer:** Present it as an appetizer alongside other finger foods at your next party.
  • **Side Dish:** Pair it with sushi, ramen, or other Asian-inspired dishes for a complete meal.
  • **Salad Topping:** Scatter cooked edamame over a fresh salad for added protein and flavor.
  • **Lunchbox Addition:** Pack it in your lunchbox for a nutritious midday treat.

Additional Tips

To ensure the best results when making Spicy Edamame, consider these helpful tips:

  1. Adjust the Spice Level: Customize the heat by adding more or less chili paste according to your taste preferences. Consider starting with a smaller amount if you’re making it for a crowd.
  2. Use Fresh Ingredients: Whenever possible, use fresh edamame for the best flavor and texture. Frozen edamame is a convenient alternative and is often just as tasty.
  3. Don’t Overcook: Be mindful not to overcook the edamame. They should be tender but still firm to the bite to maintain their vibrant color and nutritional value.
  4. Add Extra Flavors: For additional depth, consider adding a splash of lime juice or a sprinkle of furikake seasoning.
  5. Garnish Creatively: Try garnishing with chopped scallions or cilantro for a refreshing contrast to the spicy flavors.

FAQ Section

Q1: Can I use shelled edamame instead of pods?

A: Yes, you can use shelled edamame. Simply reduce the cooking time as they will cook faster than edamame in the pod. They make for easier eating, especially if serving as a salad topping.

Q2: How do I store leftover Spicy Edamame?

A: Store any leftovers in an airtight container in the refrigerator for up to 3 days. Reheat gently in a skillet or enjoy them cold as a refreshing snack.

Q3: Is there a way to make this recipe gluten-free?

A: Absolutely! Substitute regular soy sauce with a gluten-free tamari or coconut aminos to make this dish gluten-free.

Q4: Can I prepare Spicy Edamame in advance?

A: Yes, you can prepare the sauce and cook the edamame in advance. Combine them just before serving to ensure the edamame remains fresh and the flavors are vibrant.

Q5: What can I do if my edamame is too spicy?

A: If your dish turns out spicier than desired, balance the heat by serving it with a creamy dip like a yogurt-based sauce or ranch dressing. You can also mix in more plain edamame to dilute the spice level.