Coconut Yogurt Smoothie Bowl

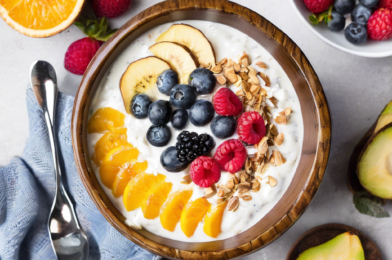
As someone who has always cherished the vibrant and health-centric world of smoothie bowls, the Coconut Yogurt Smoothie Bowl stands out as a delightful treat that combines tropical flavors with creamy textures. Recently, I had the pleasure of introducing this recipe to my family, and the response was overwhelmingly positive. The refreshing combination of coconut yogurt, fresh fruits, and crunchy toppings created a harmonious balance that left everyone craving for more. The smoothie bowl not only satisfied our taste buds but also provided a nourishing start to our day. It’s a perfect blend of indulgence and nutrition, making it a staple in our breakfast routine.

Ingredients

The Coconut Yogurt Smoothie Bowl is a versatile and customizable dish, but there are some core ingredients that form its delicious foundation. Here’s what you’ll need to get started:

  • 1 cup coconut yogurt: This serves as the creamy base of your smoothie bowl, offering a subtle coconut flavor and a rich, silky texture.
  • 1 ripe banana: A natural sweetener that adds creaminess when blended.
  • 1/2 cup tropical fruits: Choose from mango, pineapple, or papaya for a burst of tropical flavor.
  • 1 tablespoon chia seeds: These tiny seeds provide a dose of omega-3 fatty acids and fiber.
  • 1/2 cup granola: Adds a satisfying crunch to your bowl.
  • Fresh fruit toppings: Sliced strawberries, blueberries, and kiwi work beautifully.
  • Shredded coconut: For garnish and an extra hint of coconut flavor.
  • Honey or agave syrup: To taste, for additional sweetness.

Instructions

Creating the perfect Coconut Yogurt Smoothie Bowl is a simple process that involves a few easy steps. Here’s how you can whip up this delicious treat:

  1. Blend the base: In a blender, combine the coconut yogurt, ripe banana, and tropical fruits. Blend until smooth and creamy. If the mixture is too thick, add a splash of coconut water or milk to reach your desired consistency.
  2. Prepare your toppings: While the base is blending, prepare your toppings. Slice your fresh fruits and set them aside. Measure out your granola, chia seeds, and shredded coconut.
  3. Assemble the bowl: Pour the smoothie mixture into a bowl. Arrange the fresh fruit slices, granola, chia seeds, and shredded coconut on top in a visually appealing manner.
  4. Sweeten to taste: Drizzle honey or agave syrup over the assembled bowl for added sweetness if desired.
  5. Enjoy: Grab a spoon and dive into your creation, savoring each bite of this nutritious masterpiece.

Nutrition Facts

Understanding the nutritional content of your meals is important, especially when aiming for a balanced diet. The Coconut Yogurt Smoothie Bowl offers a healthy, nutrient-rich option for breakfast or a snack.

  • Servings: This recipe makes one serving.
  • Calories per serving: Approximately 350 calories, depending on the specific ingredients and quantities used.

Preparation Time

The beauty of the Coconut Yogurt Smoothie Bowl lies not only in its taste but also in its convenience. With a busy lifestyle, finding time to prepare a nutritious meal can be challenging. This recipe, however, is quick and easy, making it an ideal choice for hectic mornings. From start to finish, you can expect to spend about 10 to 15 minutes preparing your smoothie bowl. This includes the time it takes to chop your fresh fruits, blend the base, and arrange your toppings. It’s a minimal time investment for a maximum flavor payoff, allowing you to enjoy a wholesome breakfast without the morning rush.

How to Serve

While the Coconut Yogurt Smoothie Bowl is delightful on its own, there are various ways to enhance its presentation and flavor. Here are some serving suggestions:

  • Layer the ingredients: For a visually stunning presentation, layer the smoothie base and toppings in a clear bowl or glass. This creates a beautiful display of colors and textures.
  • Use edible flowers: Garnish with edible flowers like nasturtiums or pansies for a pop of color and a touch of elegance.
  • Pair with a beverage: Complement your smoothie bowl with a hot cup of herbal tea or a refreshing glass of coconut water.
  • Serve chilled: For a refreshing experience, chill the bowl and ingredients before assembling for a cool, invigorating start to your day.
  • Share and enjoy: Make multiple bowls and enjoy a healthy breakfast with family or friends, turning it into a delightful communal meal.

Additional Tips

To make the most out of your Coconut Yogurt Smoothie Bowl experience, here are some additional tips to consider:

  1. Experiment with flavors: Don’t hesitate to mix and match different fruits and toppings to suit your taste preferences. Tropical fruits like dragon fruit or passion fruit can introduce new flavors.
  2. Make it vegan: For a vegan version, ensure that your granola and sweeteners are plant-based. Coconut nectar is a great alternative to honey.
  3. Boost the protein: Add a scoop of your favorite plant-based protein powder to the smoothie base for an extra protein kick.
  4. Prep in advance: Save time by preparing the fruits and toppings the night before and storing them in airtight containers in the refrigerator.
  5. Adjust the sweetness: Depending on the ripeness of your fruits, you might need to adjust the amount of sweetener used. Taste as you go and adjust accordingly.

FAQ Section

Here are some frequently asked questions about the Coconut Yogurt Smoothie Bowl:

  1. Can I use regular yogurt instead of coconut yogurt? Yes, you can substitute regular yogurt if you prefer. However, the coconut yogurt adds a distinct tropical flavor that complements the fruits.
  2. What can I use if I don’t have a blender? If you don’t have a blender, you can mash the banana and mix it with the yogurt using a fork. The texture will be chunkier, but still delicious.
  3. Can I make this smoothie bowl ahead of time? While it’s best enjoyed fresh, you can prepare the smoothie base in advance and store it in the refrigerator for up to 24 hours. Add the toppings just before serving.
  4. Is this recipe suitable for people with dietary restrictions? This recipe can be easily adapted to accommodate various dietary needs. Use gluten-free granola for those with gluten sensitivities and plant-based yogurt for vegans.
  5. What other toppings can I use? Feel free to get creative with your toppings! Nuts, seeds, dried fruits, and nut butter can all add different textures and flavors to your smoothie bowl.

Lemon Poppy Seed Pancakes

When I first stumbled upon the recipe for Lemon Poppy Seed Pancakes, I was intrigued by the combination of flavors. I decided to give it a try for our family brunch last weekend, and it turned out to be a delightful experience. The pancakes were light, fluffy, and had a refreshing citrusy tang that was perfectly complemented by the subtle crunch of poppy seeds. My family couldn’t get enough of them, and even my picky eater gave them a thumbs up. These pancakes have now become a regular feature in our weekend breakfast rotation.

Ingredients

The beauty of the Lemon Poppy Seed Pancakes lies in their simplicity and the freshness of their ingredients. Here’s what you’ll need to make a batch for four:

  • 1 cup of all-purpose flour
  • 2 tablespoons of sugar
  • 1 tablespoon of poppy seeds
  • 1 teaspoon of baking powder
  • 1/2 teaspoon of baking soda
  • 1/4 teaspoon of salt
  • 3/4 cup of buttermilk
  • 1/4 cup of freshly squeezed lemon juice
  • 2 tablespoons of melted butter
  • 1 large egg
  • Zest of 1 lemon (about 1 tablespoon)
  • 1 teaspoon of vanilla extract

Instructions

Crafting these pancakes is as enjoyable as eating them. Follow these steps to create your own batch of Lemon Poppy Seed Pancakes:

  1. In a large mixing bowl, combine the flour, sugar, poppy seeds, baking powder, baking soda, and salt. Whisk them together until well mixed.
  2. In another bowl, whisk together the buttermilk, lemon juice, melted butter, egg, lemon zest, and vanilla extract until smooth and well blended.
  3. Pour the wet ingredients into the dry ingredients and stir gently until just combined. Be careful not to over-mix; a few lumps are okay.
  4. Heat a non-stick skillet or griddle over medium heat and lightly grease it with butter or cooking spray.
  5. Pour about 1/4 cup of batter onto the skillet for each pancake. Cook until bubbles form on the surface and the edges look set, about 2-3 minutes.
  6. Flip the pancakes and cook for an additional 2 minutes or until golden brown and cooked through.
  7. Transfer the pancakes to a warm plate and repeat with the remaining batter.

Nutrition Facts

Each serving of these delicious pancakes is not only a treat for your taste buds but also a moderate indulgence:

  • Servings: 4
  • Calories per serving: Approximately 250

Preparation Time

One of the best things about this recipe is that it doesn’t take much time, allowing you to enjoy a leisurely breakfast without the fuss:

  • Preparation time: 10 minutes
  • Cooking time: 15 minutes
  • Total time: 25 minutes

How to Serve

These pancakes are incredibly versatile and can be served in several delightful ways:

  • Drizzle with maple syrup or honey for a classic touch.
  • Top with fresh berries like blueberries or raspberries for an added burst of flavor.
  • Sprinkle with powdered sugar for a simple yet elegant presentation.
  • Serve with a dollop of whipped cream for an indulgent treat.
  • Pair with a side of yogurt or fruit salad for a balanced meal.

Additional Tips

To ensure your Lemon Poppy Seed Pancakes turn out perfectly every time, consider these helpful tips:

  • Use fresh ingredients: Fresh lemon juice and zest are key to achieving the best flavor. Avoid bottled lemon juice if possible.
  • Don’t over-mix the batter: A few lumps in the batter are normal and will lead to fluffier pancakes.
  • Let the batter rest: Allow the batter to sit for a few minutes before cooking to let the ingredients meld together.
  • Adjust the heat: If the pancakes are browning too quickly, lower the heat to ensure they cook evenly without burning.
  • Keep pancakes warm: Place cooked pancakes on a baking sheet in a warm oven (200°F) while you finish cooking the rest.

FAQ Section

Here are some common questions about Lemon Poppy Seed Pancakes, along with their answers:

Q: Can I make these pancakes gluten-free?

A: Yes, you can substitute all-purpose flour with a gluten-free flour blend. Make sure to check that all your ingredients are certified gluten-free.

Q: Can I prepare the batter ahead of time?

A: It’s best to prepare the batter fresh; however, you can mix the dry ingredients and wet ingredients separately and combine them just before cooking.

Q: What can I use as a substitute for buttermilk?

A: You can make a buttermilk substitute by adding 1 tablespoon of lemon juice or vinegar to 1 cup of milk. Let it sit for 5 minutes before using.

Q: How do I store leftover pancakes?

A: Store leftover pancakes in an airtight container in the refrigerator for up to 3 days. Reheat them in a toaster or oven before serving.

Q: Can I freeze these pancakes?

A: Yes, these pancakes freeze well. Allow them to cool completely, then store in a freezer-safe bag for up to 2 months. Reheat directly from the freezer in the oven or toaster.

With this recipe, Lemon Poppy Seed Pancakes are sure to become a favorite in your household. The combination of flavors and textures creates a breakfast experience like no other. Enjoy making them as much as you enjoy eating them!

Sweet Potato and Kale Hash

There’s something truly delightful about the combination of sweet potatoes and kale in a dish. The natural sweetness of the sweet potatoes pairs perfectly with the slightly bitter, earthy taste of kale, creating a harmonious blend that is both nutritious and satisfying. Recently, I tried out a recipe for Sweet Potato and Kale Hash, and it instantly became a family favorite. The vibrant colors and robust flavors made it not only a treat for the palate but also a feast for the eyes. Whether served as a hearty breakfast or a nutritious dinner, this dish has a comforting quality that brings warmth to any dining table. My family loved it so much that they asked for seconds, and I have a feeling that it will become a regular feature in our meal rotations.

Ingredients

The beauty of this Sweet Potato and Kale Hash is that it incorporates simple, wholesome ingredients that you might already have in your pantry. Here’s what you’ll need:

  • 2 large sweet potatoes, peeled and diced
  • 1 bunch of kale, stems removed and leaves chopped
  • 1 medium onion, finely chopped
  • 2 cloves of garlic, minced
  • 1 red bell pepper, diced
  • 2 tablespoons of olive oil
  • 1 teaspoon of ground cumin
  • 1/2 teaspoon of smoked paprika
  • Salt and pepper to taste
  • Optional: 4 eggs
  • Optional: Avocado slices for serving

Instructions

Making Sweet Potato and Kale Hash is straightforward and doesn’t require much time, making it perfect for busy weeknights or relaxed weekend brunches. Follow these instructions to prepare a delectable dish:

  1. Start by heating the olive oil in a large skillet over medium heat.
  2. Add the chopped onions and sauté for about 2-3 minutes until they become translucent.
  3. Stir in the minced garlic and diced red bell pepper. Cook for another 2 minutes.
  4. Add the diced sweet potatoes, cumin, and smoked paprika. Season with salt and pepper to taste. Stir well to combine.
  5. Cover the skillet and let the sweet potatoes cook for about 10-15 minutes, stirring occasionally, until they are tender.
  6. Once the sweet potatoes are cooked through, add the chopped kale to the skillet. Stir well and cook for another 5 minutes until the kale is wilted.
  7. If you want to add eggs, make small wells in the hash and crack an egg into each well. Cover the skillet and cook until the eggs are set to your liking.
  8. Serve the hash warm, optionally topped with avocado slices for added creaminess.

Nutrition Facts

This recipe serves approximately 4 people. Each serving of the Sweet Potato and Kale Hash contains about 250 calories, making it a light yet filling meal option. If you choose to add eggs, the calorie count will increase slightly, but it will also boost the protein content, making it a well-rounded meal.

Preparation Time

One of the many advantages of this recipe is its quick preparation time. From start to finish, you can have this dish ready in about 30 minutes. The prep work is minimal, and the cooking process is straightforward, making it an excellent choice for those who want to enjoy a home-cooked meal without spending too much time in the kitchen.

How to Serve

This versatile dish can be served in several ways, depending on your preferences and the occasion. Here are a few serving suggestions:

  • As a Main Dish: Serve the hash on its own for a light, vegetarian meal.
  • With Eggs: Top with poached or fried eggs for added protein.
  • As a Side Dish: Pair with grilled chicken or fish for a more substantial meal.
  • With Avocado: Add slices of avocado or a dollop of guacamole for extra creaminess.
  • On Toast: Serve on top of crusty bread or toast for a delicious open-faced sandwich.

Additional Tips

To ensure that your Sweet Potato and Kale Hash turns out perfectly every time, here are some additional tips:

  • Use Fresh Ingredients: The freshness of your ingredients will greatly impact the flavor of the dish. Opt for fresh, crisp kale and firm sweet potatoes for the best results.
  • Cut Evenly: Cut your sweet potatoes and other vegetables into uniform pieces to ensure even cooking.
  • Spice It Up: If you enjoy a bit of heat, consider adding a pinch of cayenne pepper or red pepper flakes.
  • Make Ahead: You can prepare the sweet potatoes and kale ahead of time, storing them separately in airtight containers in the fridge. This will further reduce your cooking time.
  • Experiment with Add-Ins: Feel free to customize the hash by adding ingredients such as mushrooms, sausage, or feta cheese to suit your taste preferences.

FAQ Section

Here are some common questions about Sweet Potato and Kale Hash:

  • Can I use frozen kale?

    Yes, frozen kale can be used if fresh kale is not available. Just be sure to thaw and drain it well before adding it to the skillet.

  • What can I use instead of sweet potatoes?

    If you don’t have sweet potatoes, you can substitute with butternut squash or regular potatoes. Keep in mind that this will slightly alter the flavor of the dish.

  • How do I store leftovers?

    Store any leftovers in an airtight container in the refrigerator for up to 3 days. Reheat gently in a skillet or microwave before serving.

  • Can I make this dish vegan?

    Absolutely! Simply omit the eggs or substitute them with tofu scramble for a delicious vegan version.

  • Is this dish gluten-free?

    Yes, Sweet Potato and Kale Hash is naturally gluten-free, making it suitable for those with gluten sensitivities or celiac disease.

Savory Breakfast Sandwich

There’s something undeniably comforting about starting your day with a savory breakfast sandwich. For many, it’s the perfect blend of convenience and satisfaction, offering a handheld meal that combines the textures and flavors of your favorite breakfast ingredients. Whether you’re rushing out the door or enjoying a leisurely morning, a well-crafted breakfast sandwich can set the tone for your day. In my household, this particular recipe has become a weekend tradition, loved by both kids and adults alike. The combination of crispy bacon, fluffy eggs, and melted cheese nestled between slices of perfectly toasted bread never fails to bring smiles around the table.

Ingredients

Creating a delicious savory breakfast sandwich starts with selecting the right ingredients. Here’s what you’ll need:

  • 4 slices of whole-grain bread: Opt for a hearty loaf that can hold up to the fillings without becoming soggy.
  • 4 large eggs: Fresh, organic eggs will give you the best flavor and texture.
  • 4 slices of bacon: Thick-cut bacon works best for a satisfying crunch.
  • 4 slices of cheddar cheese: Sharp cheddar adds a rich, savory depth to the sandwich.
  • Butter: For toasting the bread and adding a golden crust.
  • Salt and pepper: To taste, for seasoning the eggs.
  • Optional: Fresh spinach or arugula: For a fresh, peppery bite.
  • Optional: Hot sauce or ketchup: For those who like a bit of heat or tang.

Instructions

Follow these steps to create a perfect savory breakfast sandwich:

  1. Cook the bacon: In a large skillet over medium heat, cook the bacon until crispy. Remove and drain on paper towels. Pour off most of the bacon fat, leaving a small amount for cooking the eggs.
  2. Prepare the eggs: Crack the eggs into a bowl, season with salt and pepper, and whisk until well combined. In the same skillet used for the bacon, pour in the eggs and scramble them over medium heat until just set.
  3. Toast the bread: While the eggs are cooking, butter one side of each slice of bread. In a separate skillet, toast the bread slices butter-side down until golden brown.
  4. Assemble the sandwich: Place a slice of cheese on each piece of toasted bread. On two slices, layer the scrambled eggs, bacon, and optional greens. Top with the remaining slices of bread, cheese-side down, to form a sandwich.
  5. Finish cooking: Return the sandwiches to the skillet, cooking over low heat until the cheese melts and the bread is crispy, flipping once. Serve immediately with optional hot sauce or ketchup.

Nutrition Facts

This recipe makes two sandwiches, with each sandwich serving one person. Each serving contains approximately 550 calories. This breakdown includes the essential macronutrients, providing a balance of carbohydrates from the bread, protein from the eggs and bacon, and fats from the cheese and butter.

Preparation Time

One of the advantages of this recipe is its efficiency. The total preparation and cooking time is approximately 20 minutes, making it an ideal choice for busy mornings or a quick weekend treat. This includes about 5 minutes of prep time and 15 minutes of cooking time, allowing you to enjoy a homemade breakfast without feeling rushed.

How to Serve

To make the most of your savory breakfast sandwich, consider the following serving suggestions:

  • Pair with a side of fresh fruit, such as sliced oranges or berries, to add a refreshing contrast.
  • Enjoy with a steaming cup of coffee or tea to complement the savory flavors.
  • Serve with a small bowl of Greek yogurt topped with honey and nuts for added protein.
  • Add a side of hash browns or tater tots for a classic breakfast experience.
  • For a brunch gathering, offer a variety of condiments like pesto, avocado slices, or pickled jalapeños for guests to customize their sandwiches.

Additional Tips

Here are some tips to ensure your breakfast sandwich turns out perfectly every time:

  1. Choose quality ingredients: The flavor of your sandwich will depend heavily on the quality of the ingredients, so opt for fresh, high-quality produce and dairy.
  2. Use a non-stick skillet: This will prevent the eggs from sticking and make for easy flipping and cleanup.
  3. Don’t overcook the eggs: Scrambled eggs should be soft and slightly creamy to perfectly complement the crispy bacon and toasted bread.
  4. Experiment with toppings: Feel free to add or substitute ingredients like sautéed mushrooms, sliced avocado, or different cheese varieties to suit your taste.
  5. Make it vegetarian: For a meatless version, replace bacon with a plant-based alternative or additional vegetables like bell peppers or tomatoes.

FAQ Section

Q: Can I make this sandwich ahead of time?

A: While it’s best enjoyed fresh, you can prepare the ingredients ahead and assemble the sandwich just before serving. Store cooked bacon and scrambled eggs in airtight containers in the refrigerator for up to two days.

Q: What bread works best for this recipe?

A: Whole-grain bread is recommended for its nutritional benefits and ability to hold up well to the fillings. However, you can use any bread you prefer, such as sourdough, ciabatta, or even a bagel.

Q: Can I freeze these sandwiches?

A: Freezing is possible, but it can affect the texture of the eggs and bread. If you decide to freeze, wrap the assembled sandwiches tightly in plastic wrap and foil, then store in a freezer-safe bag for up to one month. Reheat in the oven or toaster oven for the best results.

Q: How can I make this recipe healthier?

A: To reduce calories and fat, use turkey bacon or a plant-based alternative, low-fat cheese, and add more vegetables. You can also opt for whole grain or sprouted bread for added fiber.

Q: What are some other cheese options that would work well?

A: Aside from cheddar, you can experiment with other cheeses like Swiss, provolone, or pepper jack for a different flavor profile. Each type of cheese will bring its unique taste and texture to the sandwich.

Blueberry Chia Jam Toast

Blueberry Chia Jam Toast has become a delightful staple in our household, often enjoyed as a quick breakfast or a satisfying snack. The combination of the sweet-tart blueberry flavor with the nutty chia seeds offers a unique texture and taste that my family has grown to adore. We find ourselves reaching for this recipe time and time again, not just for its taste but also for its simplicity and health benefits. The vibrant purple hue of the jam spread generously over a crispy piece of toast creates an eye-catching, mouthwatering treat that is as visually appealing as it is delicious.

Ingredients

The ingredients required for Blueberry Chia Jam Toast are straightforward and likely already in your pantry, making it a go-to recipe for many. You’ll need:

  • 2 cups of fresh or frozen blueberries: These provide the base for the jam, offering natural sweetness and a burst of antioxidants.
  • 2 tablespoons of chia seeds: Chia seeds are the secret ingredient that thickens the jam while adding a dose of omega-3 fatty acids and fiber.
  • 1-2 tablespoons of honey or maple syrup: Adjust the sweetness to your preference, keeping in mind that blueberries can vary in sweetness.
  • 1 tablespoon of lemon juice: This adds a slight tang and helps to preserve the jam’s vibrant color.
  • Your favorite bread for toasting: Choose a hearty whole-grain or sourdough bread for the best results.

Instructions

Making this jam is as easy as it is rewarding. Follow these steps to create your own batch of blueberry chia jam:

  1. Cook the blueberries: In a medium saucepan, combine the blueberries and lemon juice. Cook over medium heat, stirring occasionally, until the berries begin to break down and release their juices, about 5-7 minutes.
  2. Add the sweetener: Stir in the honey or maple syrup, tasting and adjusting to your desired level of sweetness.
  3. Thicken with chia seeds: Stir in the chia seeds, mixing well to ensure they are evenly distributed.
  4. Simmer the mixture: Reduce the heat to low and let the mixture simmer for about 10-15 minutes, stirring occasionally, until the jam reaches your desired thickness. Remember, the jam will continue to thicken as it cools.
  5. Cool and store: Remove the jam from the heat and let it cool completely. Once cooled, transfer the jam to a jar or airtight container and store it in the refrigerator for up to two weeks.
  6. Prepare the toast: Toast your chosen bread to your preferred level of crispiness.
  7. Assemble the toast: Spread a generous amount of blueberry chia jam on each slice of toast, and enjoy!

Nutrition Facts

This recipe yields approximately 8 servings, with each serving containing around 60 calories. These nutrition facts make it a guilt-free indulgence that fits well into a balanced diet.

Preparation Time

From start to finish, you can have this delightful treat ready in about 30 minutes. This includes both the cooking time for the jam and the time it takes to toast the bread. It’s a quick and easy option for busy mornings or for when you need a snack in a pinch.

How to Serve

Blueberry Chia Jam Toast is versatile and can be enjoyed in various ways. Here are some serving suggestions:

  • Top with sliced bananas for added sweetness and potassium.
  • Sprinkle with a handful of granola for extra crunch.
  • Add a dollop of Greek yogurt for creaminess and protein.
  • Pair with a side of scrambled eggs for a more substantial meal.
  • Drizzle with a bit of almond or peanut butter for a nutty twist.

Additional Tips

To make the most out of your Blueberry Chia Jam Toast, consider the following tips:

  1. Experiment with flavors: Try adding a pinch of cinnamon or a splash of vanilla extract to the jam for a unique twist.
  2. Use fresh ingredients: Fresh blueberries will provide the best flavor, but frozen berries can be a great alternative, especially when blueberries are out of season.
  3. Adjust sweetness: If you prefer a less sweet jam, reduce the amount of honey or maple syrup. Taste as you go to find your perfect balance.
  4. Storage tips: Store the jam in a sterilized jar to extend its shelf life. This can also be a thoughtful homemade gift for friends and family.
  5. Double the batch: This jam is so delicious that you may want to make a double batch. It can be stored in the freezer for up to three months, making it a convenient option for future cravings.

FAQ Section

Here are answers to some common questions about Blueberry Chia Jam Toast:

  1. Can I use other fruits instead of blueberries? Yes, you can substitute blueberries with other berries or fruits like raspberries, strawberries, or peaches. Adjust the sweetness according to the fruit’s natural sugar content.
  2. Is this recipe vegan? Yes, if you use maple syrup instead of honey, this recipe is fully vegan.
  3. How long does the jam last in the refrigerator? The jam will last up to two weeks in the refrigerator. Ensure it is stored in an airtight container to maintain freshness.
  4. Can I use a different type of bread? Absolutely, feel free to use any bread you prefer. Whole-grain and sourdough breads are popular choices for their texture and flavor.
  5. Why are chia seeds used in this recipe? Chia seeds are used because they naturally thicken the jam without the need for pectin or additional cooking. They also add a boost of nutrition with fiber and omega-3 fatty acids.